
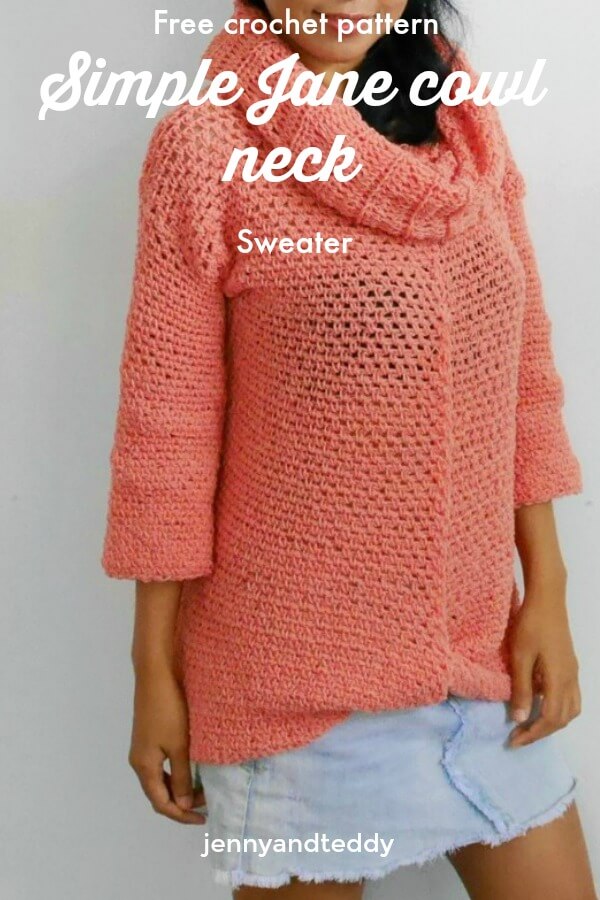
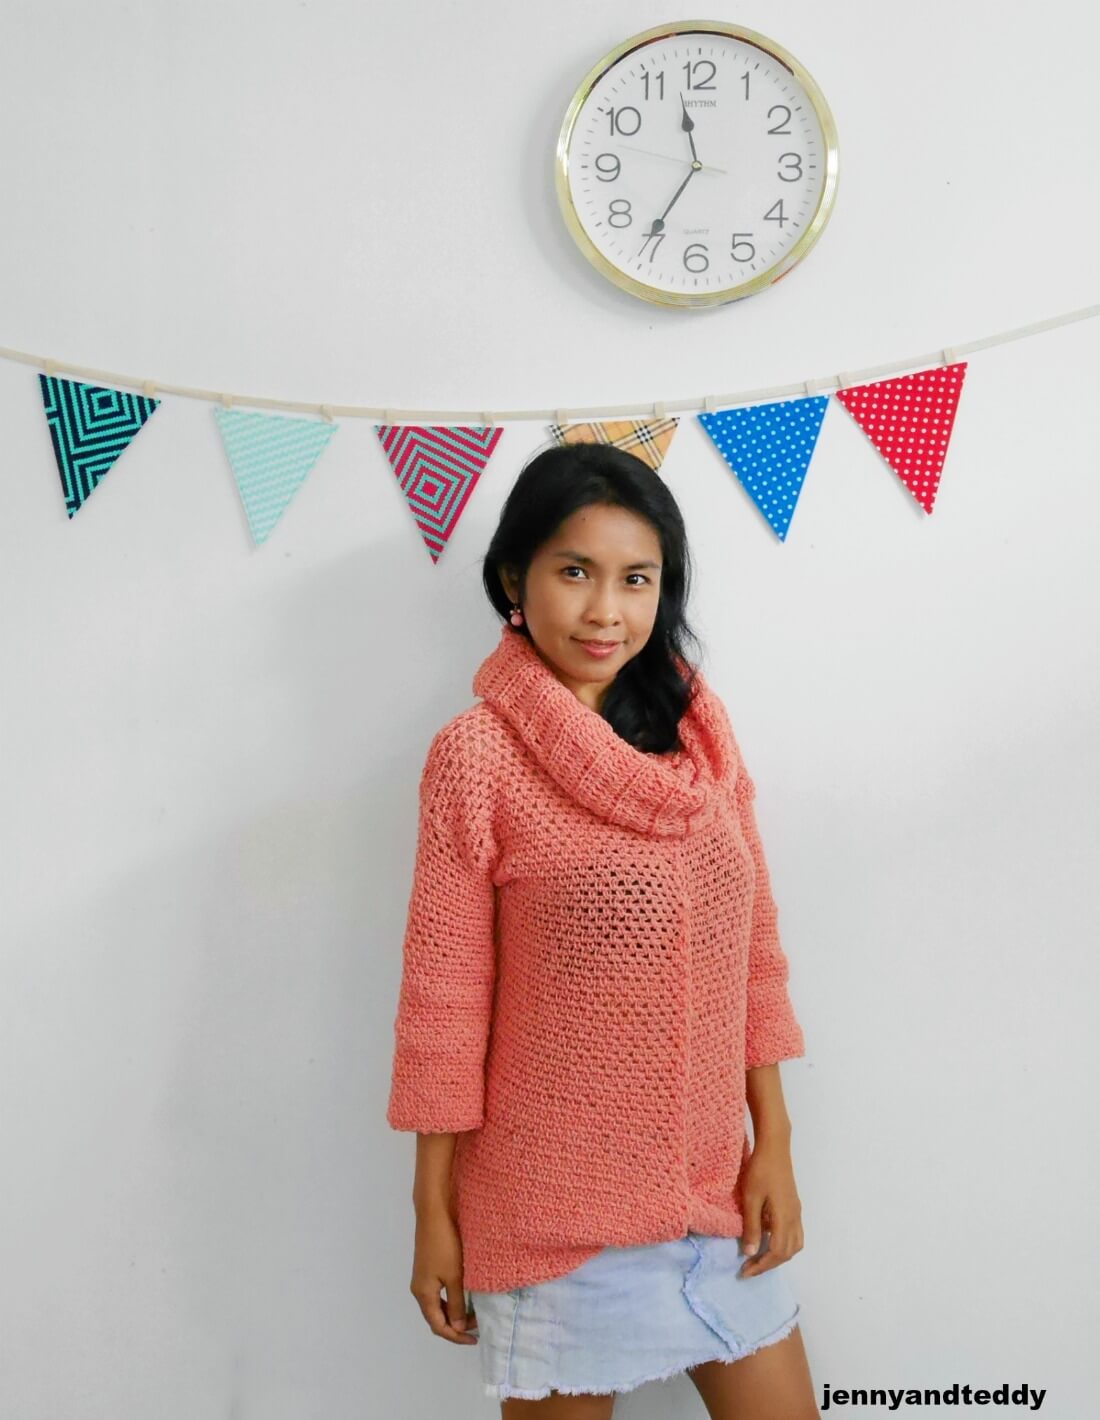
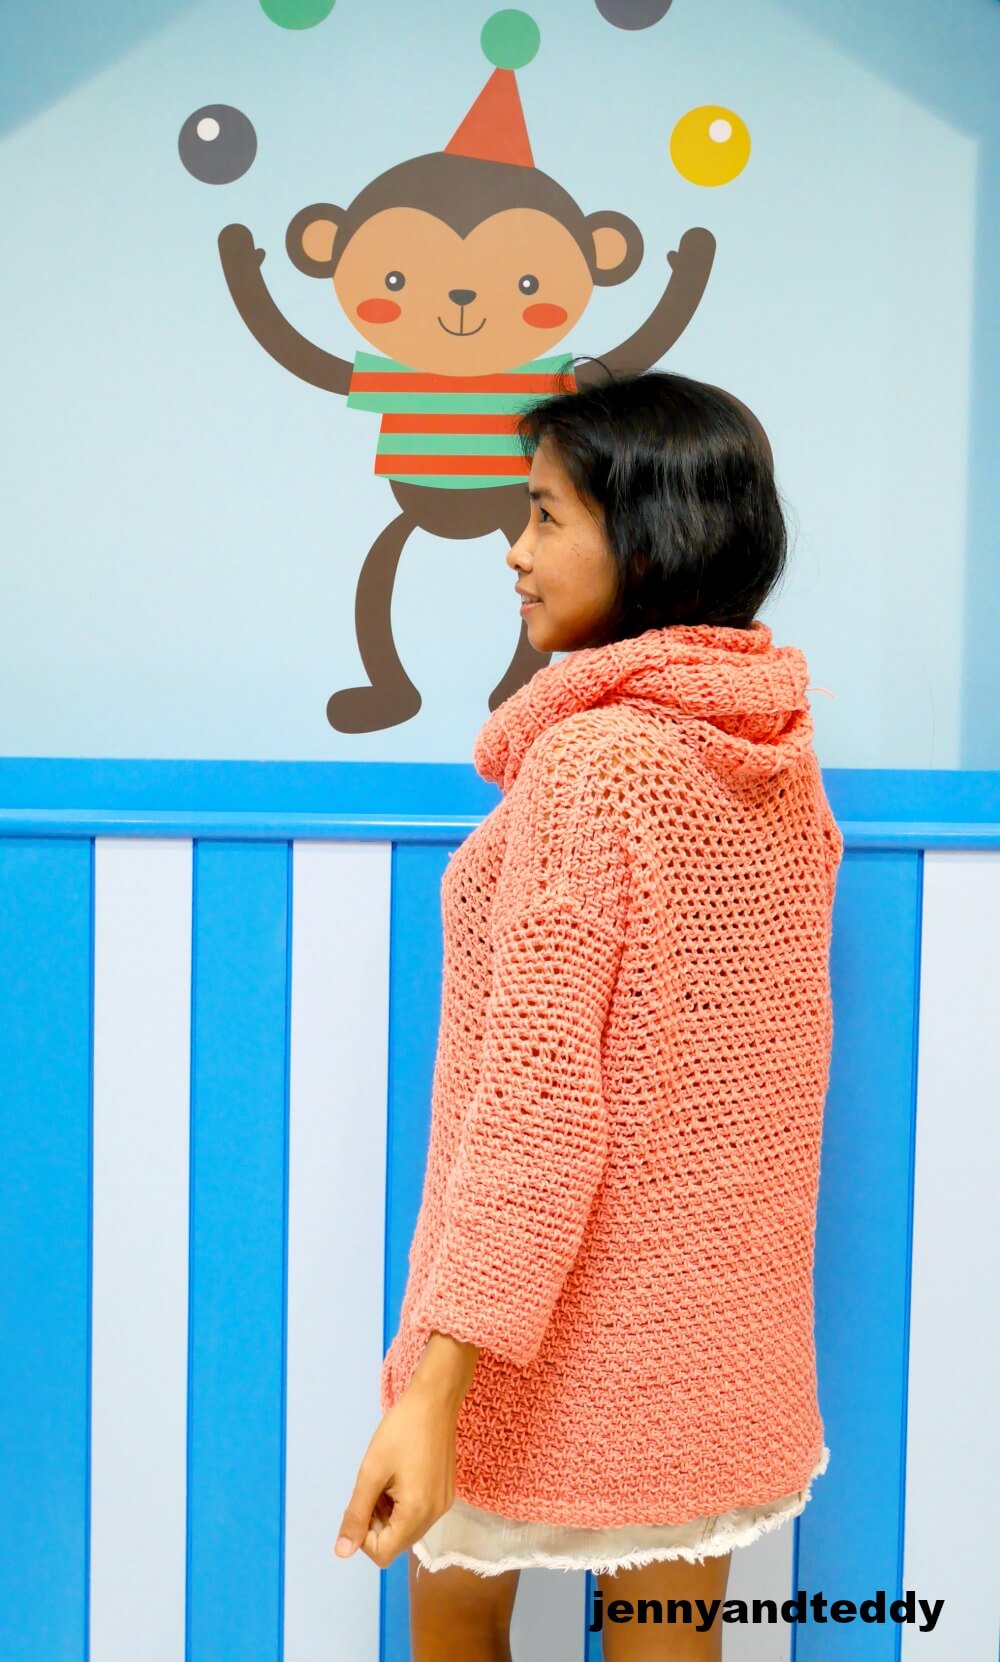
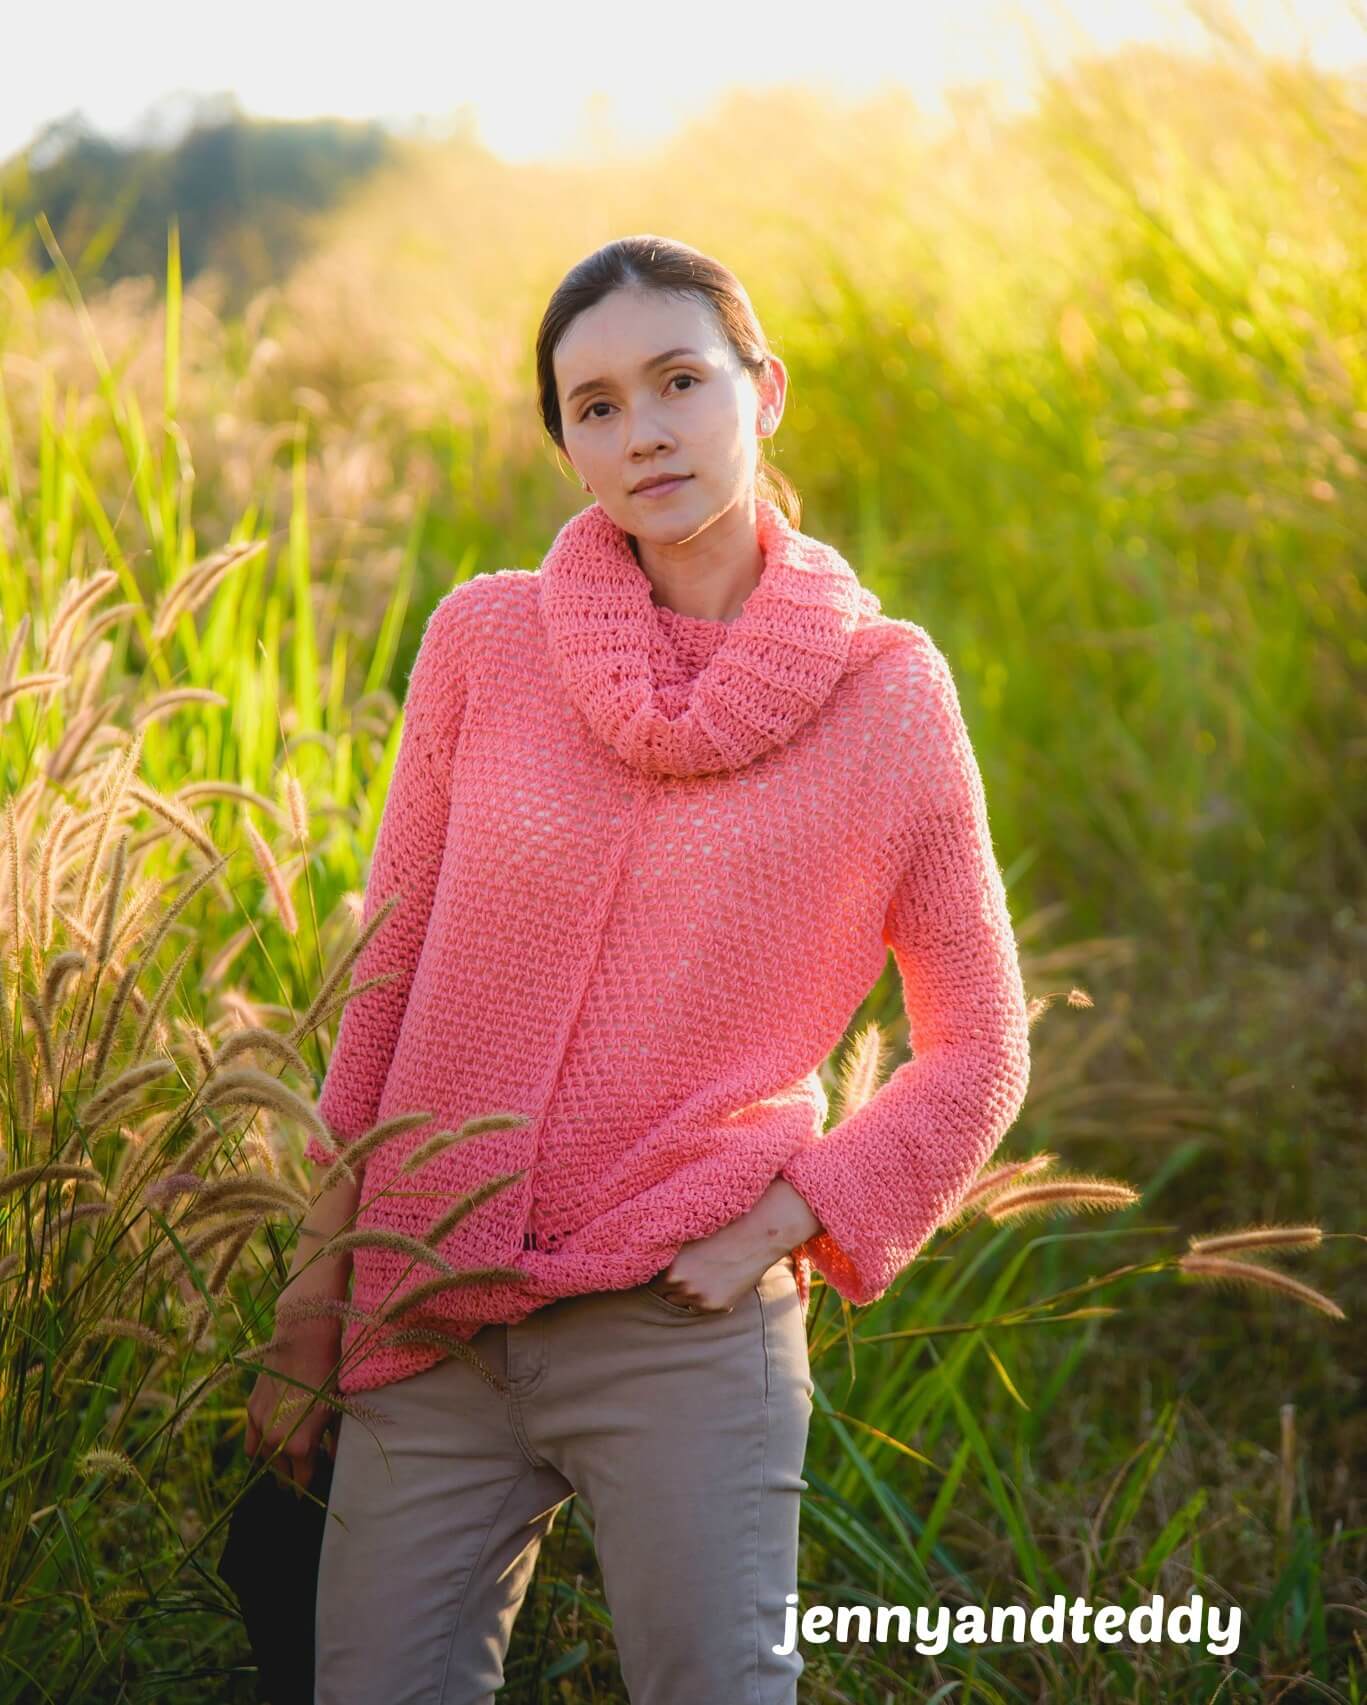
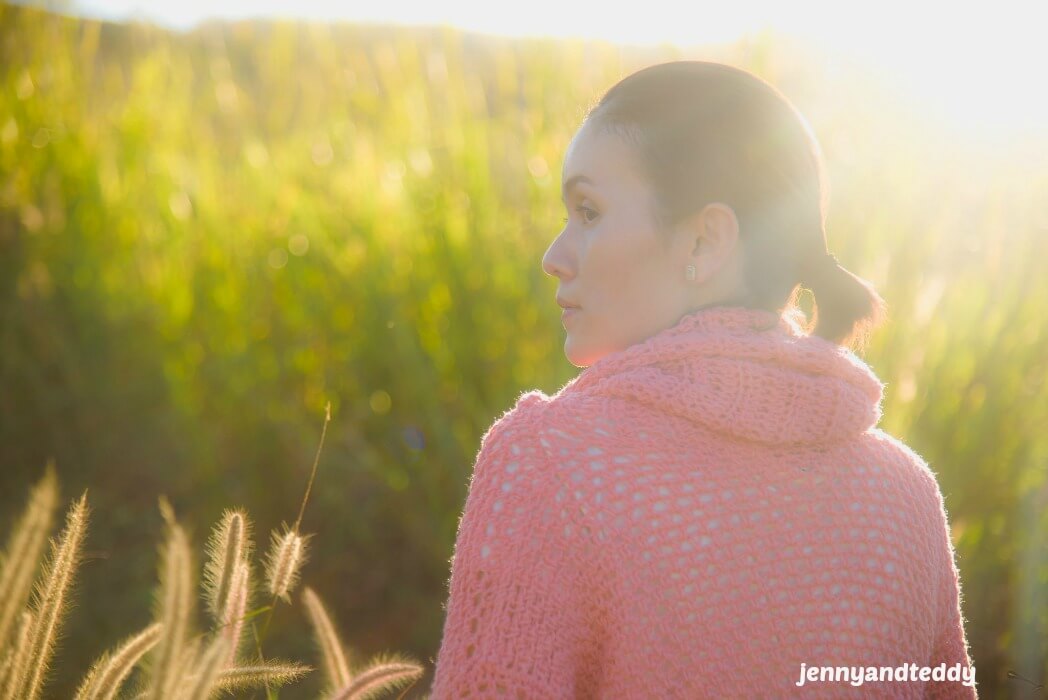
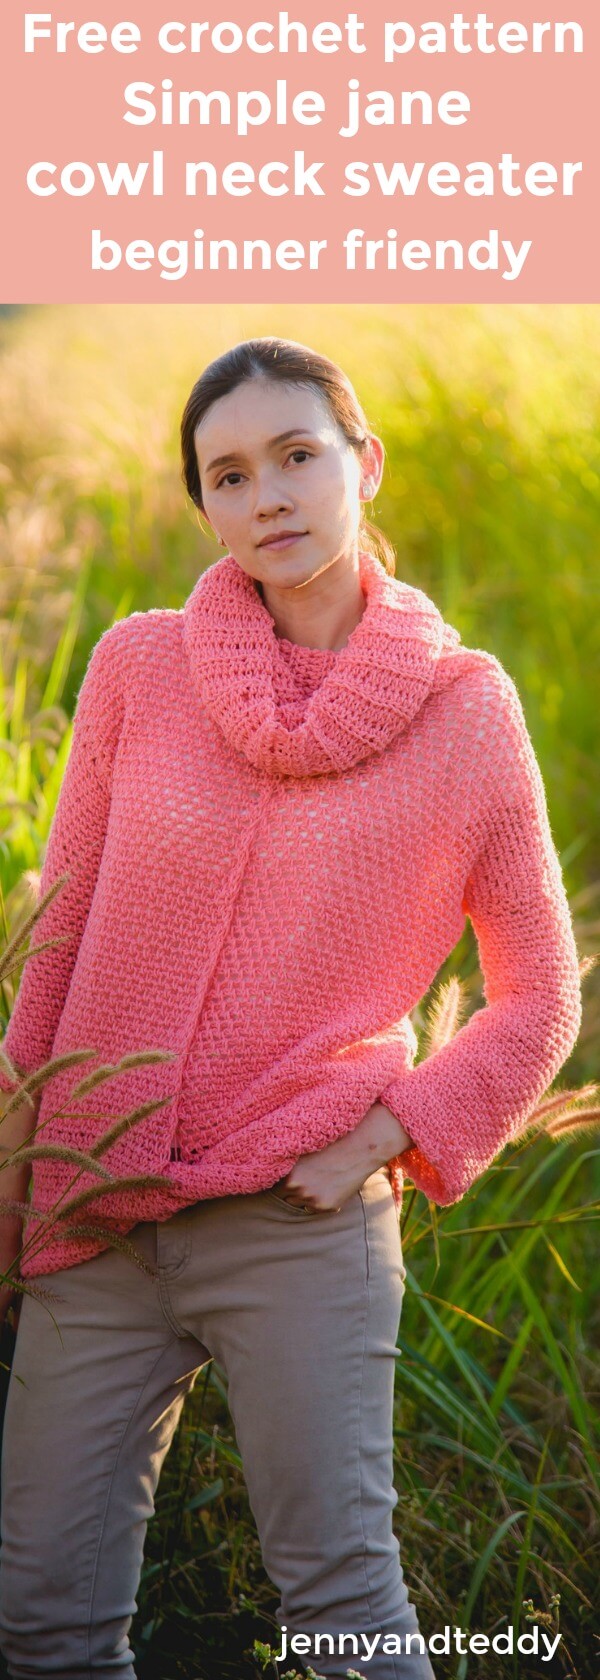
Hello October! So my obsession with all kind of crochet sweater is ongoing to do on the long list. Here another beginner crochet sweater for you guy to make and take in your wardrobe! And the name of this sweater is called ” Simple Jane cowl neck crochet sweater”
I thought it was fun to add my name to some of my crochet project. ^^
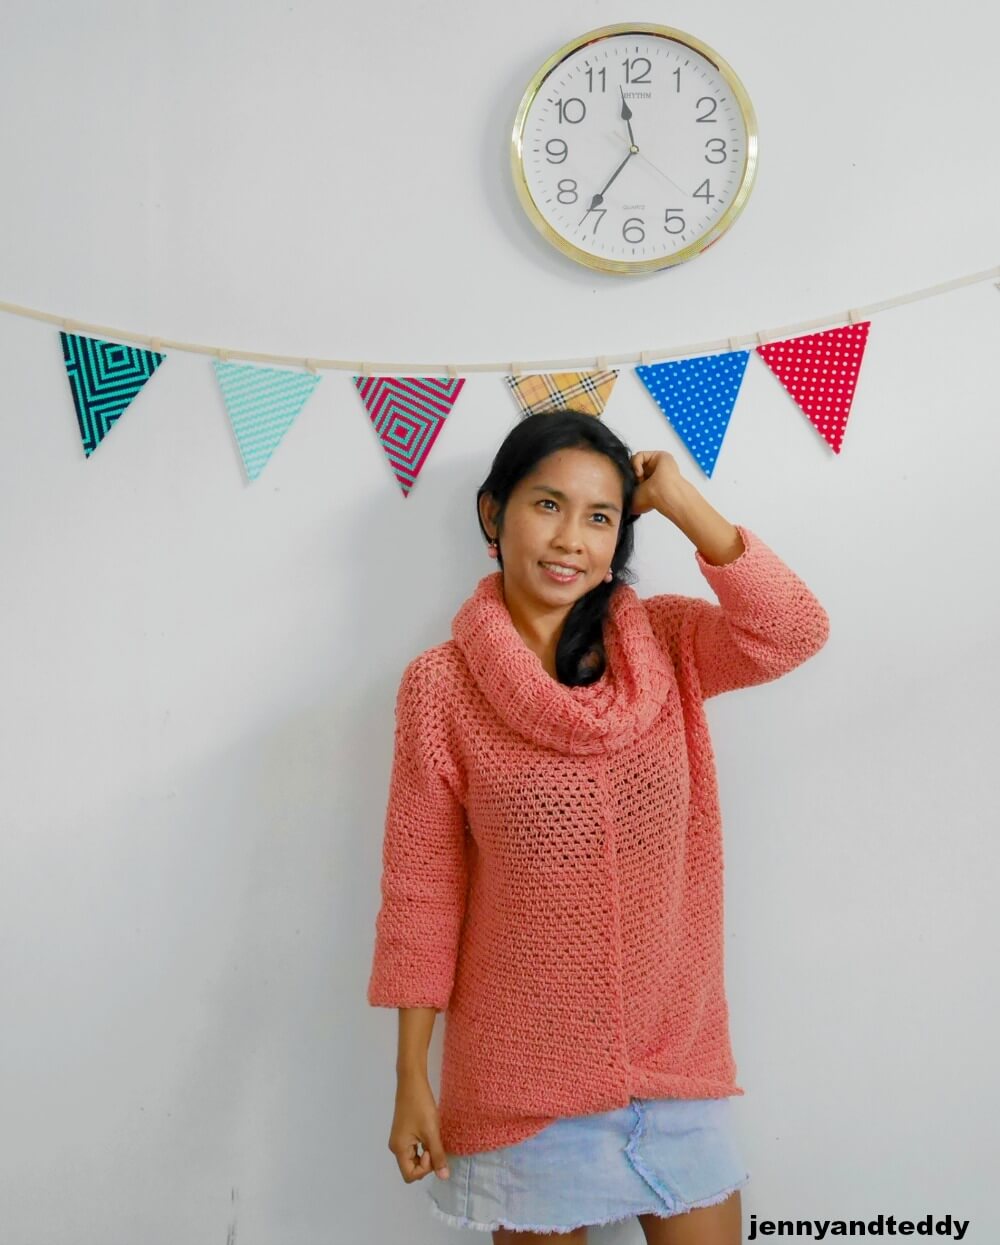
So The simple jane crochet sweater is here! And they are made from the easiest stitch for beginner as well called Moss or linen stitch Which I had a tutorial on my blog too!

Moss stitch is one of my favorite stitch ever because it can turn my hard not so soft acrylic yarn That I have to be light and flowy to be come soft and cuddly texture! how cool is this stitch?
And you know what? This sweater is came out accidently from cardigan ! Before I was going to make a cardigan with this cute color and the moss stitch but they turn out to be a sweater! have you guy ever think going to make something but finally it turn out to be something else? lol
Get the free pattern below or this pattern is also available as an inexpensive, ad-free, PDF printable instant download in my etsy shop. Thank you so much for your love and support. I am really appreciate you.
Here another moss stitch crochet sweater you might like Knit look oversize crochet sweater.
Let’s get start!
– I used 100% acrylic Lion brand Heartland or Lion brand Wool-Ease yarn weight 4 aran. I use around 800 yard.
– 6 mm crochet hook or J/10 US hook size
– Sewing yarn needle
-stitch marker
Gauge: 2 moss stitch = 1 inch
Skill and abbreviations
(American crochet terms)
You will need to know how to make
-St which mean stitch
-sc which mean single crochet
-hdc which mean half double crochet
-Blo which mean crochet in back loop only
-ch, Chain
-slip knot
Finished Size Approximately:
Small to medium ( Easy to adjust by add more chain to the foundation chain for bigger size)
For me the model wearing this piece, I am 4’9 feet tall.
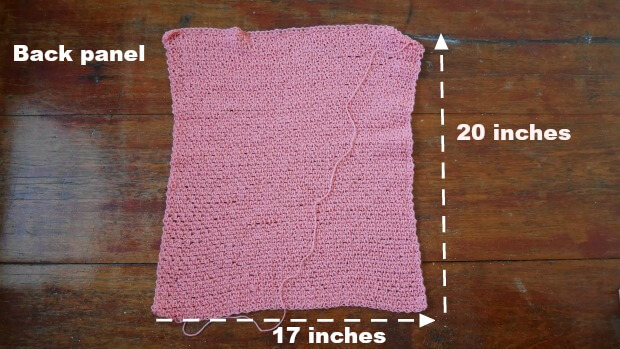
Measurement of back panel.
of one rectangle.
-20 inches long
-17 inches wide
For the width: If you need to make it wider ( bigger size) simply add more chain in even number multiple of 2.
For the length: add more row.
Simple jane crochet sweater instruction.
Pick up crochet hook size 6 mm and Start of by making a slip knot Then make 60 chains size small (foundation chain multiple of 2 )
For size medium make 70 chain, size Large make 80 chain, size xl make 90 chain and size 2xl 100 chain.
Row1. sc in second chain from hook and each chain across, ch1 turn
Row2. sc in the next stitch from hook * ch1, skip 1 st, sc in next st * repeat * to * across until the end of the row. Ch1 turn
Row3. sc in the first ch space * ch1, skip 1 st, sc in next ch space * repeat * to * across until the end of the row and make sc on the turning ch. Ch1 turn
Repeat row 3 until your piece measures approximately 20 inches long , Fasten off.
Measurement of front panel make 2 pieces.

of one rectangle.
-24inches long
-11 inches wide
For the width: If you need to make it wider ( bigger size) simply add more chain in even number multiple of 2.
For the length: add more row.
Pick up crochet hook size 6 mm and Start of by making a slip knot Then make 40 chains size small (foundation chain multiple of 2 )
For size medium make 50 chain, size Large make 60 chain, size xl make 70 chain and size 2xl 80 chain.
Row1. sc in second chain from hook and each chain across, ch1 turn
Row2. sc in the next stitch from hook * ch1, skip 1 st, sc in next st * repeat * to * across until the end of the row. Ch1 turn
Row3. sc in the first ch space * ch1, skip 1 st, sc in next ch space * repeat * to * across until the end of the row and make sc on the turning ch. Ch1 turn
Repeat row 3 until your piece measures approximately 24 inches long , Fasten off.
And repeat the same for the second piece.
Now you have 2 pieces of the front panel then we will ready to assembly the front part of this sweater.
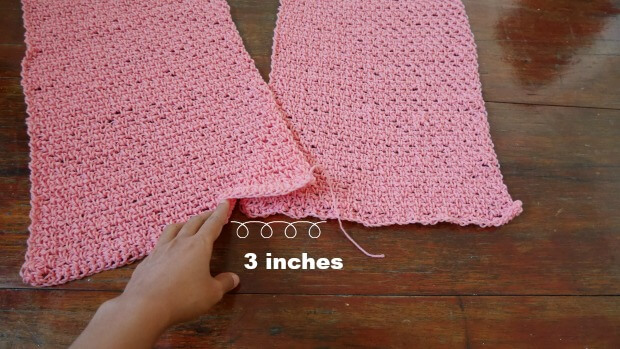
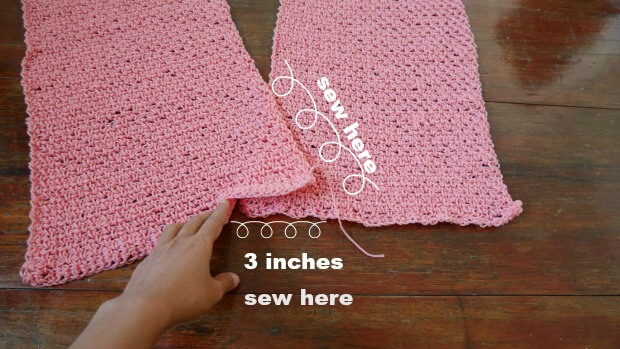
lay 2 piece of front panel side by side.
Then collapse each end about 3 inches like in the pic above and place stitch marker to fixed to position. And use yarn needle to sew them together. see photo below.
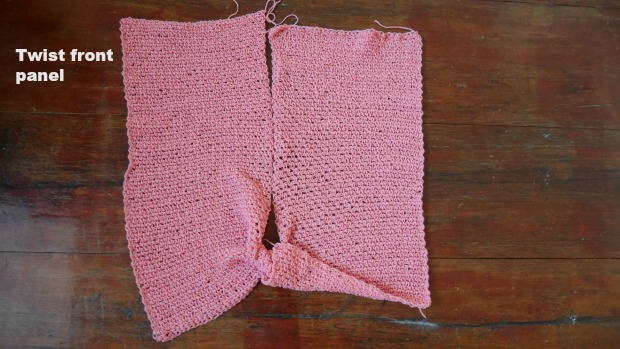
After that we will twist the front part see photo below.
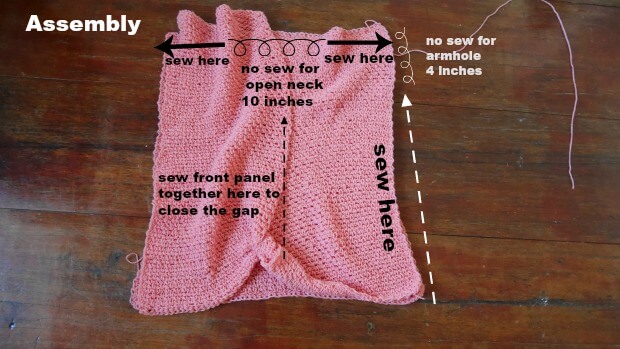
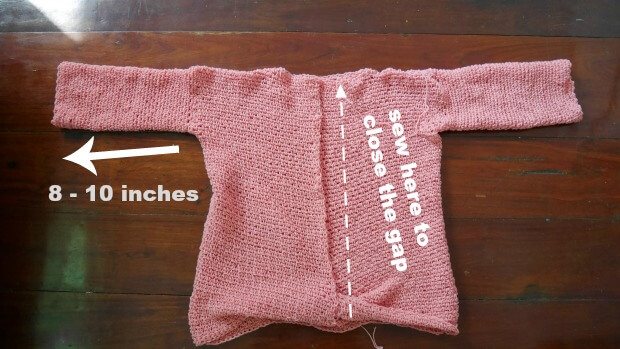
Then we will assemble the body of the sweater.
By lay front panel on top of back panel and use yarn to sew it as the photo show below.
Note. when you lay front panel on top of back panel , you will see that the back panel is smaller than the front panel so don’t worry I make it that way! to create the flowy sweater. So Just sewing as you normally do.
Now we will make the sleeve.
By join yarn at any stitch of the arm hole then sc around the arm hole for 1 round.
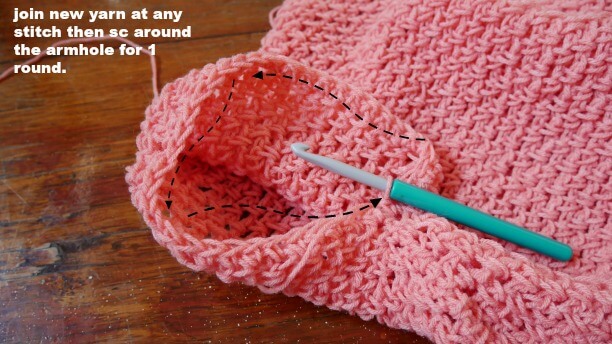
The we will start to crochet moss stitch at the arm hole.
At the arm hole we will work in a spiral do not join round.
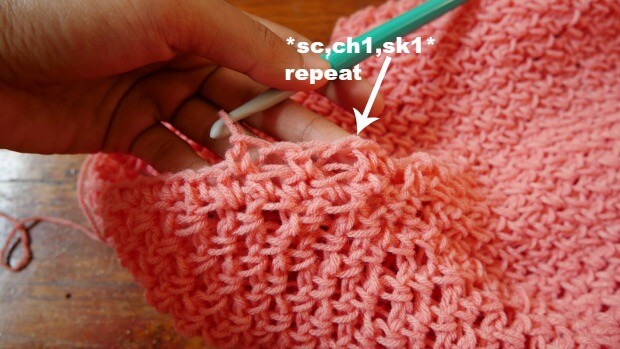
round 1 of moss stitch. sc in the next stitch from hook * ch1, skip 1 st, sc in next st * repeat * to * across until the end of the round. do not join round
round2. sc in the first ch space * ch1, skip 1 st, sc in next ch space * repeat * to * across until the end of the round. do not join round.

Repeat row 2 until your sleeve measures approximately 10 inches long or your desired length , Fasten off. Then repeat for the second sleeve.
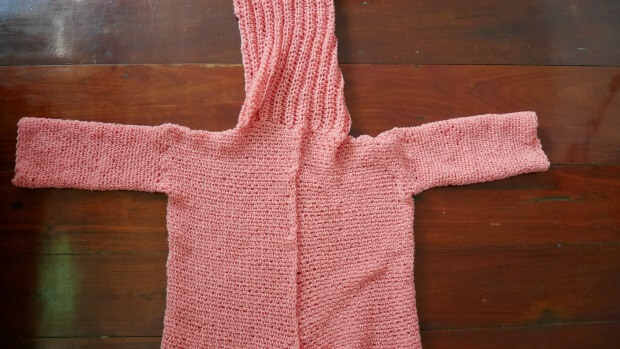
Now time to make the cowl neck.
We make the ribbing cowl neck separate from the sweater body.
Next we will make the band by crocheting them separate from the body of the sweater.
Pick up your 6 mm crochet hook and start with making a slip knot and 60 chains and crochet row by row the back loop only until you get the length that matches the length of the bottom part of the sweater.
Row1. crochet 1hdc in each of the next chains from hook, ch1 turn
Row2. crochet 1hdc in each of the next stitches from hook ( blo only), ch1 turn
Repeat round 2 until you get the length matching the length of the neck.

After you finished the this piece then we are going to attach the ribbing piece to the opening neck of the sweater by sewing using yarn needle.

Attached by sewing.

Now you have it! Cowl neck sweater.
Love more free pattern? Please share and comment ^^.
If you make one I would love to see your creation tag me on Instagram!