
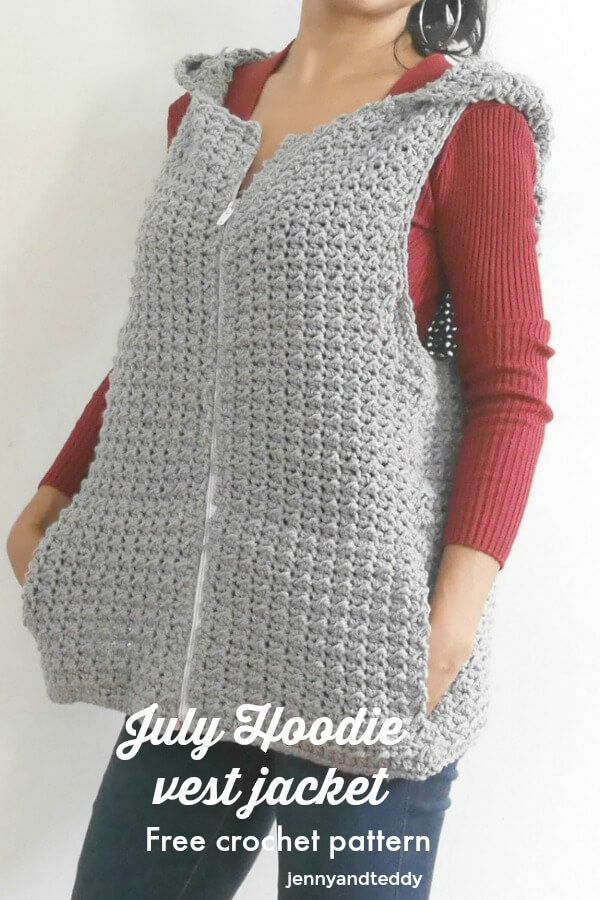
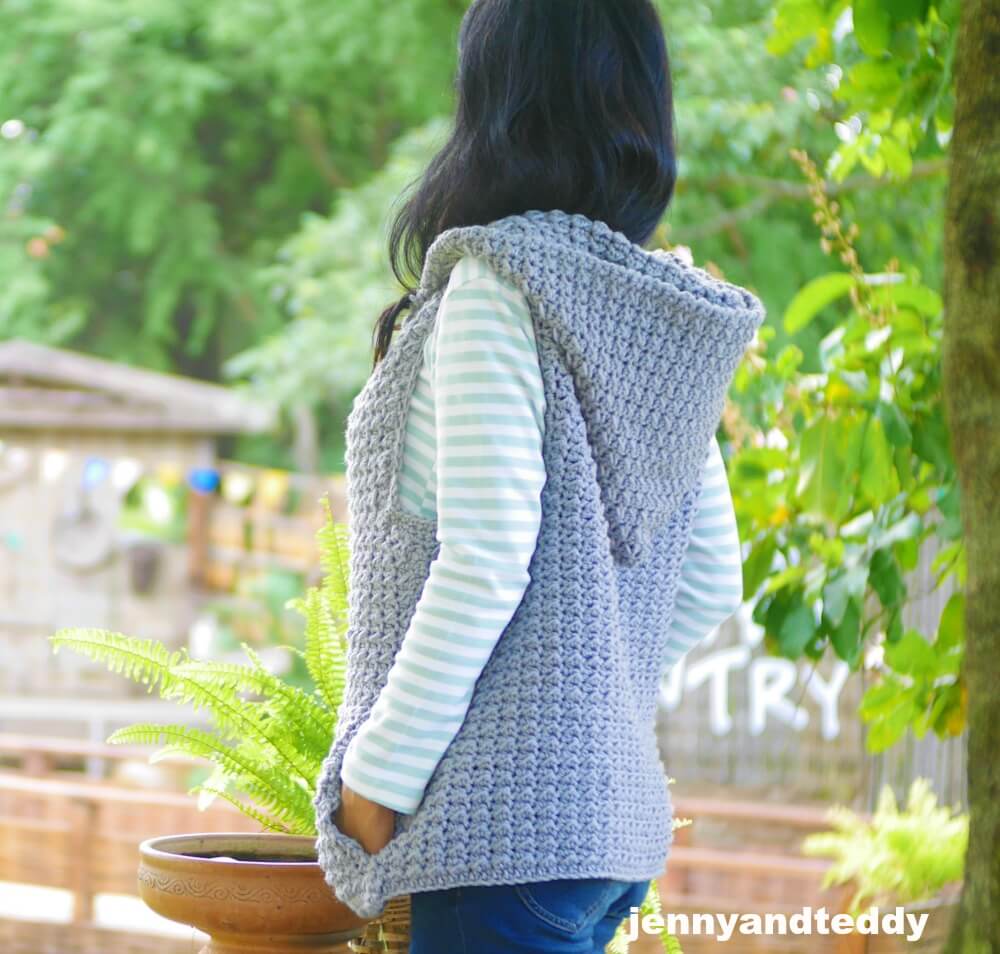
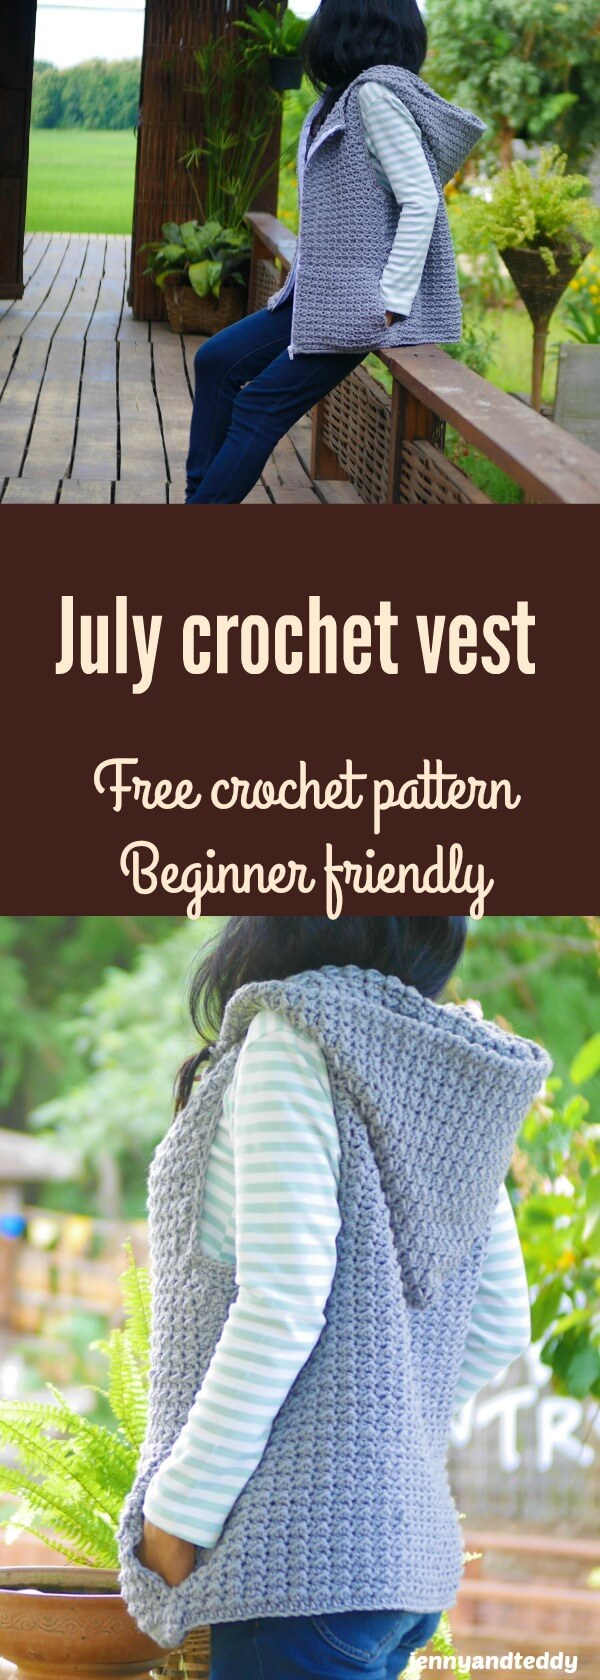
Time fly by! And this July crochet hooded jacket has straightforward, easy construction, which is perfect enough for less experienced crocheters.
This month of July is just the beginning of the rainy season here in Thailand woohoo! like name of this crochet jacket, I don’t know why I came up with this name..lol.
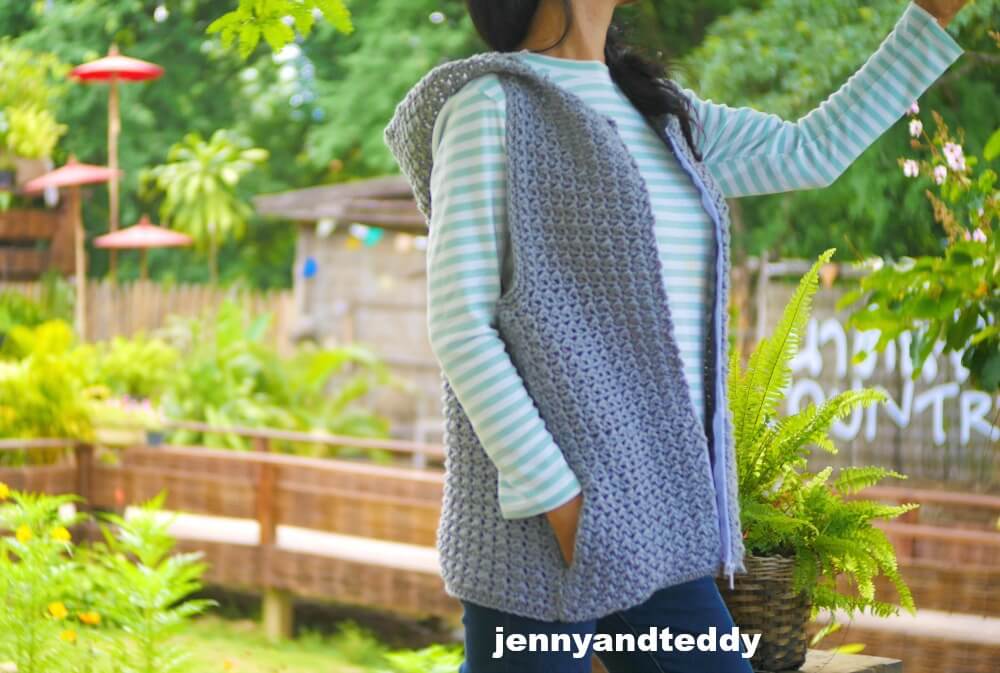
So I was tempted to make a long sleeve boyish style crochet jacket with a hoodie, but they turned out to be kind of a vest jacket with no sleeves.
Easy crochet hood jacket pattern.
This simple crochet jacket is unbelievably easy, and a plus is I had to add the good size pocket to keep your hand in place. I knew everyone loved pockets, right? Me too!
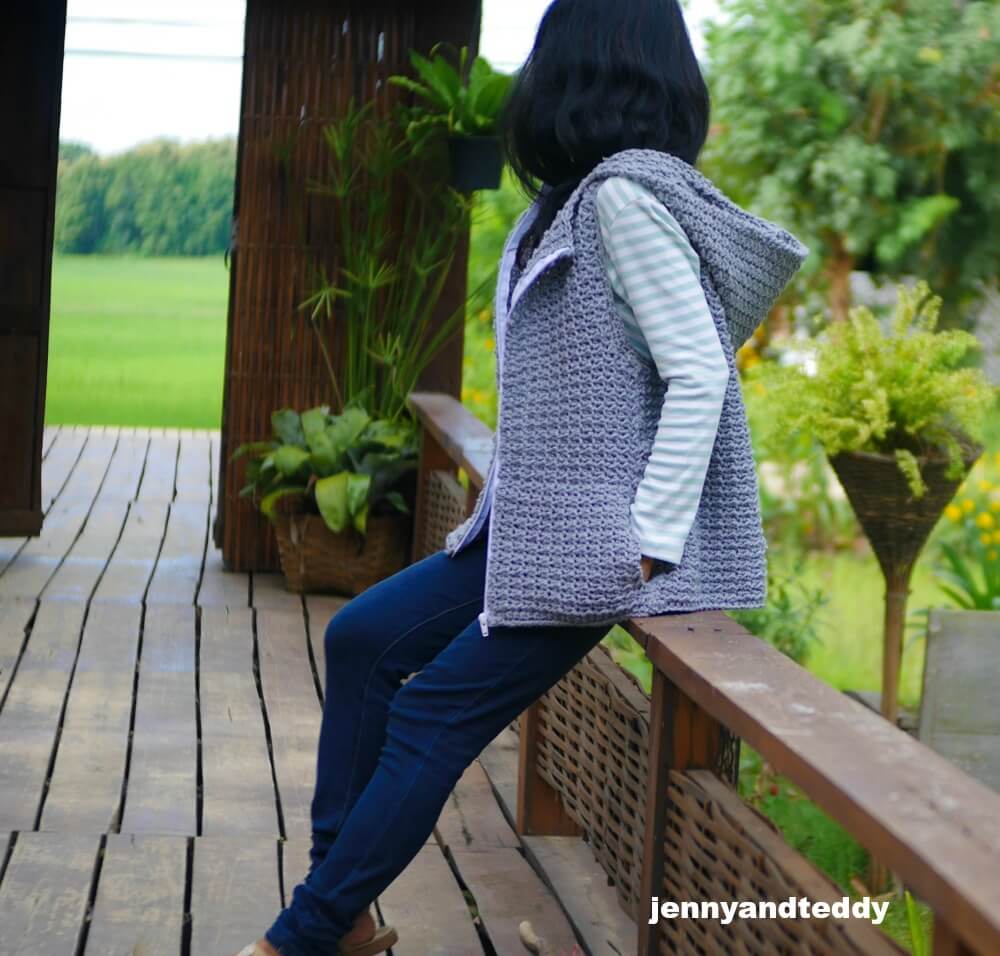
It was my first time adding zippers to crochet projects, especially garments; oh well, they are super easy, guys!
I did not have a sewing machine, so I did hand sew, and oh, they are quick and surprisingly easy!
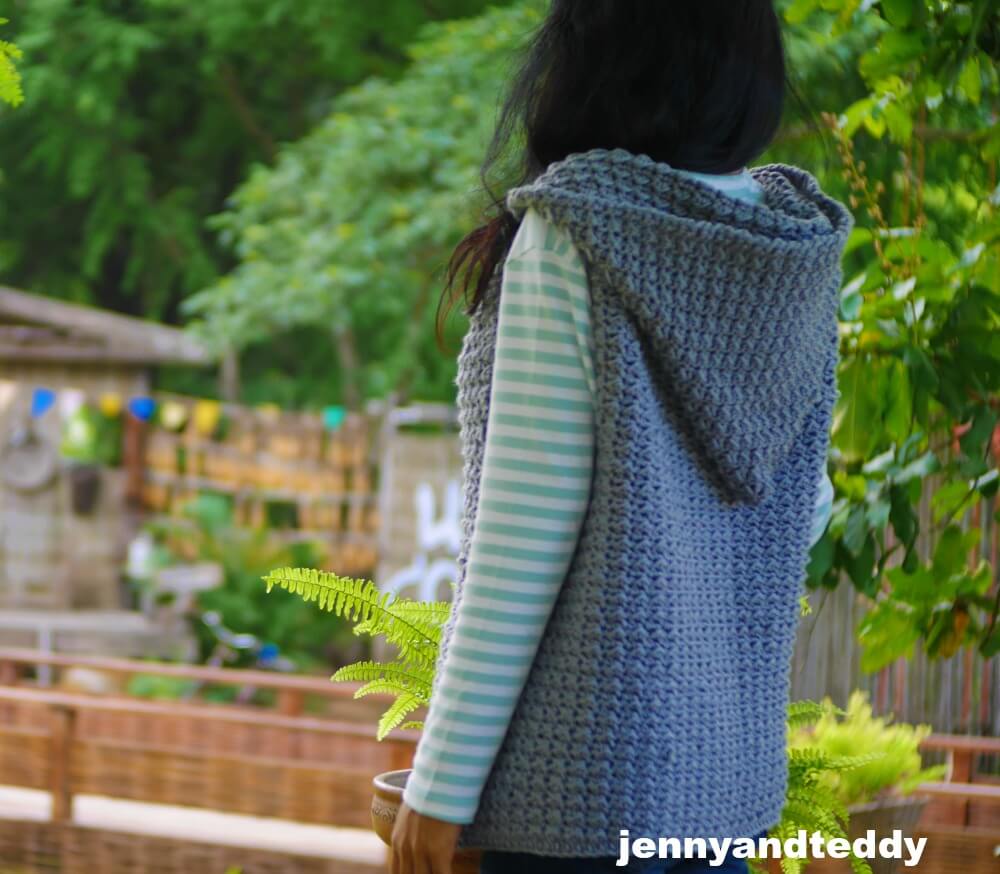
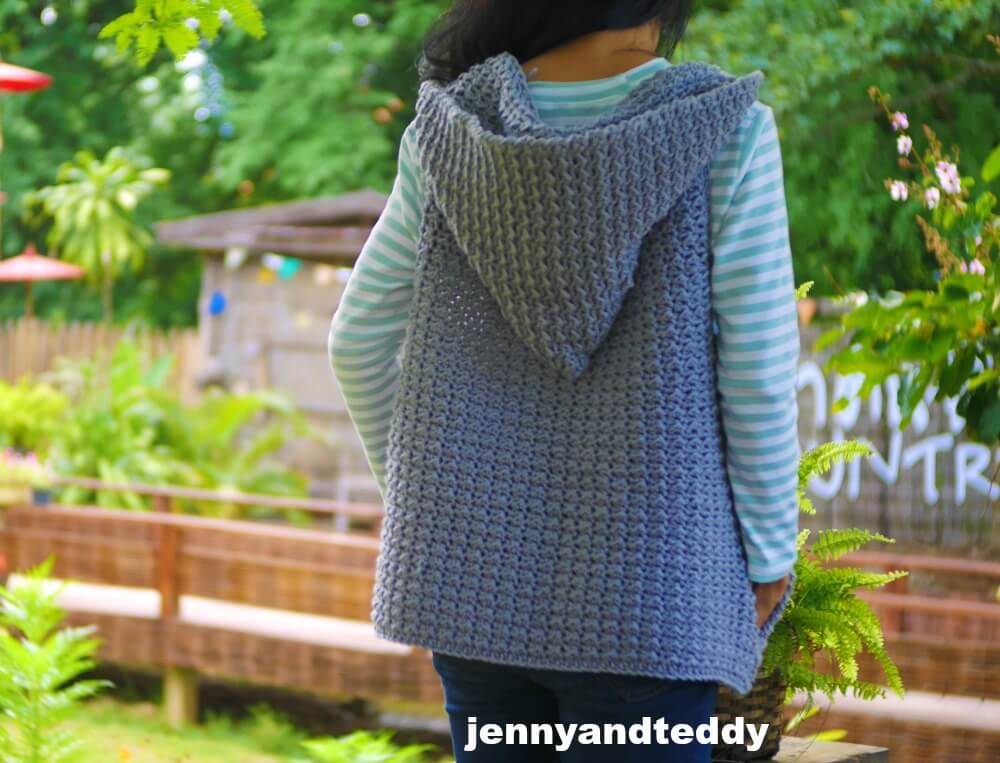
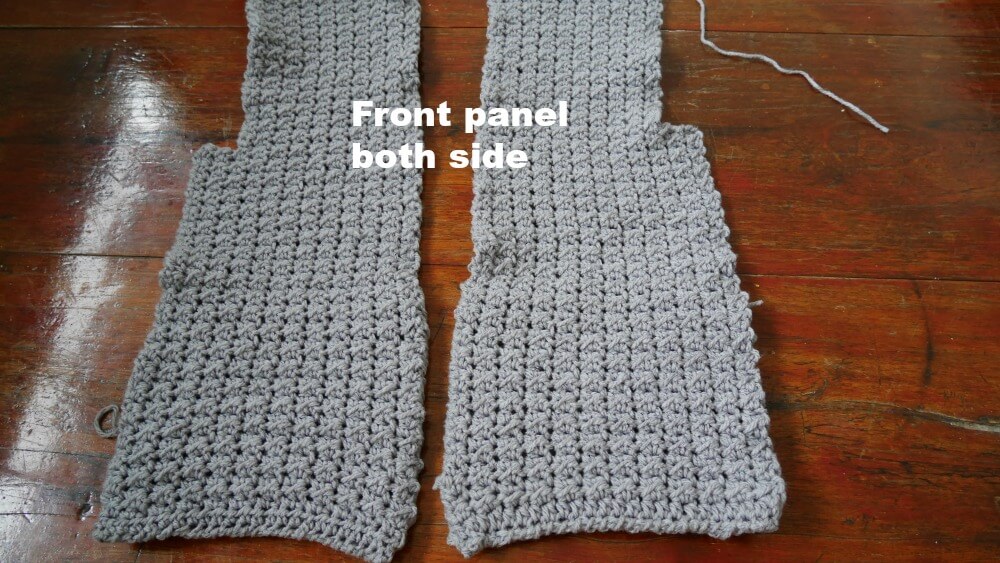
The July hoodie jacket is made from 3 panels; the two front panels are exactly the same, and one back panel.
Then after you have done with all three panels, we will crochet the hoodie separately and attach it to the jacket that’s all you’re done!
Which yarn to use for this simple crochet jack pattern?
In this free crochet jacket pattern, I use 10-ply acrylic yarn, which you can use similarly. Maybe go for a dk weight hold double when crocheting or 5 bulky yarn will do also.
This July jacket can work with any kind of fiber content, for example, cotton, bamboo, polyester, or wool yarn. They all do fine.

Supplies & materials.
- I used bulky yarn, yarn weight 5 bulky. , The one That I would recommend is from Knitpicks Brava bulky yarn, 100% acrylic. They have a great variety at a good price!!! I Love them ^^. Brava bulky yarn.
- Or you could go for a cotton blend for a comfy texture with Plymouth Jeannee Chunky Yarn.
- Even go for luxury and toasty warm 100% wool with Cloudborn Superwash Merino Bulky Yarn.
- I am using about 1400 yards altogether.
- 6 mm crochet hook or J/10 US hook size
- Sewing yarn needle
- stitch marker
- sewing thread needle to add zipper
- Zipper
Skill and abbreviations
- (American crochet terms)
- You will need to know how to make
- Sl st (slip stitch)
- sc which means single crochet
- hdc, which means half double crochet
- ch, Chain
- slip knot
Gauge: 2 (hdc,sl st) x 2 rows = 1.5-2 square inch
Finished Size Approximately: one size fit small and medium. And size up to 2 XL.
See the detail in the pattern instruction below.
For me the model wearing this piece, I am 4’9 feet tall.
Get the free pattern below or this pattern is also available as an inexpensive, ad-free, PDF printable instant download in my etsy shop. Thank you so much for your love and support. I am really appreciate you.
July hoodie crochet jacket free pattern instruction.
Back panel.
- Measurement of the back panel.
- 12 inches wide
- 26 inches long

For the width: If you need to make it wider, simply add more chains in even numbers to the foundation chain..like 60, 70, 80, etc. I start this poncho with foundation chains of 70.
For the length: add more rows.
Back panel. Start off by making a slip knot.
- Then make 70 chains ( fit size s and m)
- size L chain 76
- size xl chain 82
- size 2xl chain 90
- foundation chain
Row1. hdc in the next chain from hook, then hdc in each chain across until the end of the row, ch1 turn.
Row2. *hdc in next st, then sl st in next st* repeat * to * across until the end of the row. Ch1 turn
Row3. Repeat row 2 or until the piece measures approximately 12 inches wide desired length. Fasten off.
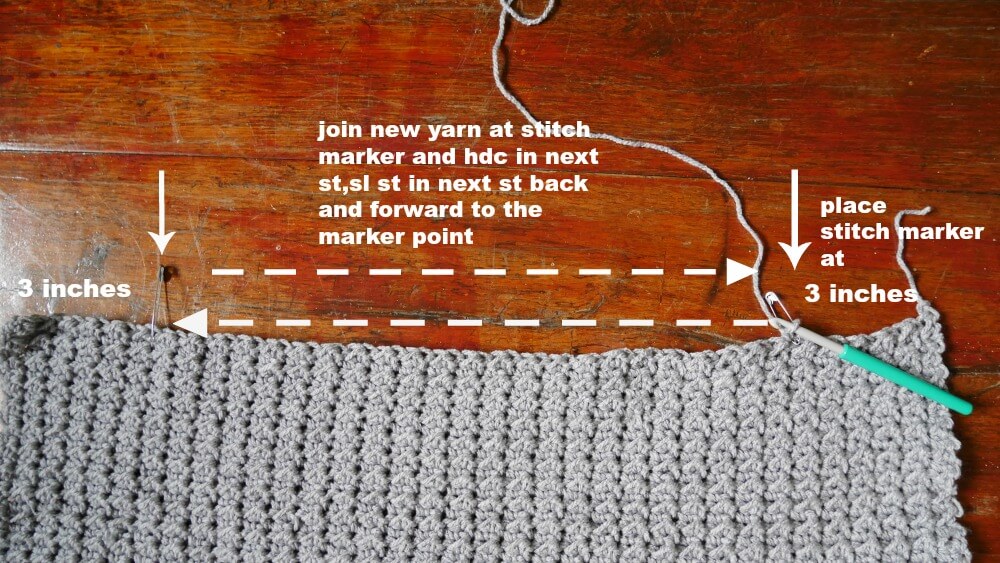
Then Place a stitch marker at 3 inches on each side of the rectangle see pic below.
And join new yarn at one side of the stitch marker and begin to crochet hdc in the next st, sl st in the next st back, and forward toward stitch marker and ch1 at the end of each row until the piece measures approximately 8 inches long.
The finished back panel, then set aside waiting for assembly.

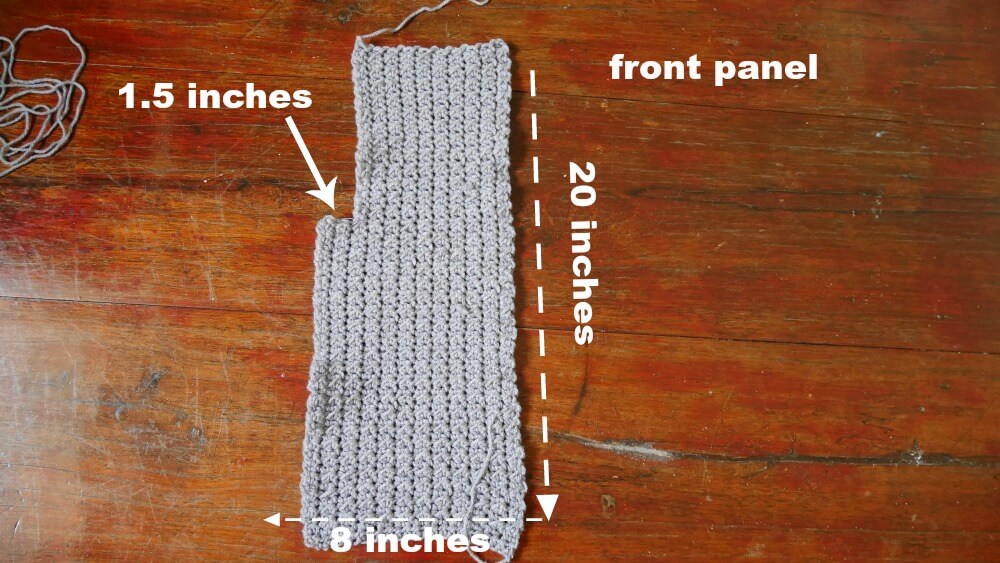
The front panel is on both sides.
- Measurement of the front panel.
- 8 inches wide
- 20 inches long
Start off by making a slip knot.
- Then ( make 24 chains for sizes s and m),
- size L chain 28
- size xl chain 32
- size 2xl chain 36
- foundation chain
Row1. hdc in the next chain from hook, then hdc in each chain across until the end of the row, ch1 turn.
Row2. *hdc in next st , then sl st in next st* repeat * to * across until the end of the row. Ch1 turn
Row3. Repeat row 2 until the piece measures approximately 12 inches long or desired length. Fasten off.
Then Place the stitch marker at 1.5 inches at one side of the rectangle see pic below.
And join new yarn at one side of the stitch marker and begin to crochet hdc in the next st, sl st in the next st back, and forward toward stitch marker and ch1 at the end of each row until the piece measures approximately 20 inches long.

Repeat on the other side of the front panel. Set aside waiting for assembly.
Crocheting the Pocket.
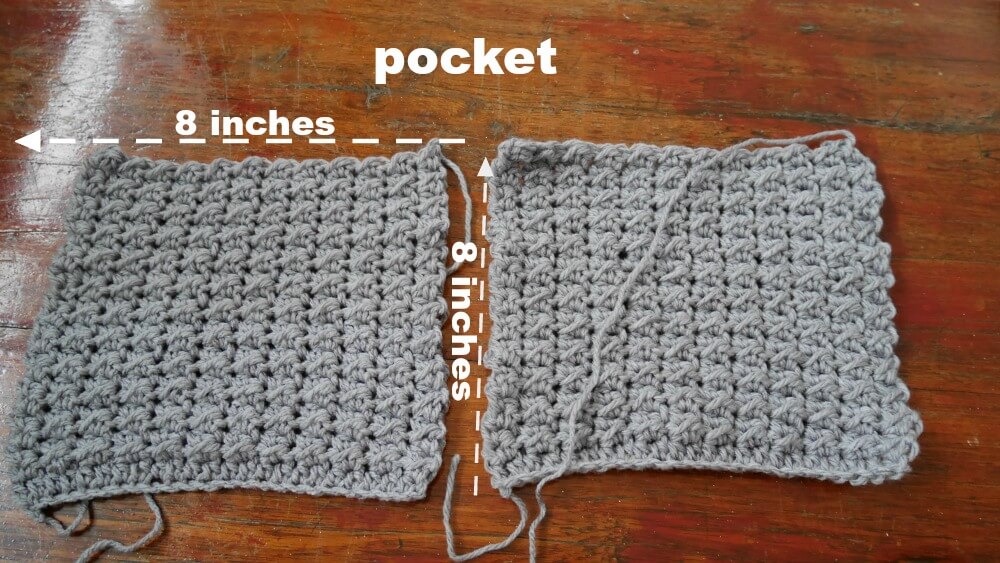
- 8 inches wide
- 8 inches long
For all size, Start off by making a slip knot, Then make 24 chains (foundation chain)
Row1. hdc in the next chain from hook, then hdc in each chain across until the end of the row, ch1 turn.
Row2. *hdc in next st , then sl st in next st* repeat * to * across until the end of the row. Ch1 turn
Row3. Repeat row 2 or until the piece measures approximately 8 inches long or desired length. Fasten off.
Set aside waiting for assembly.
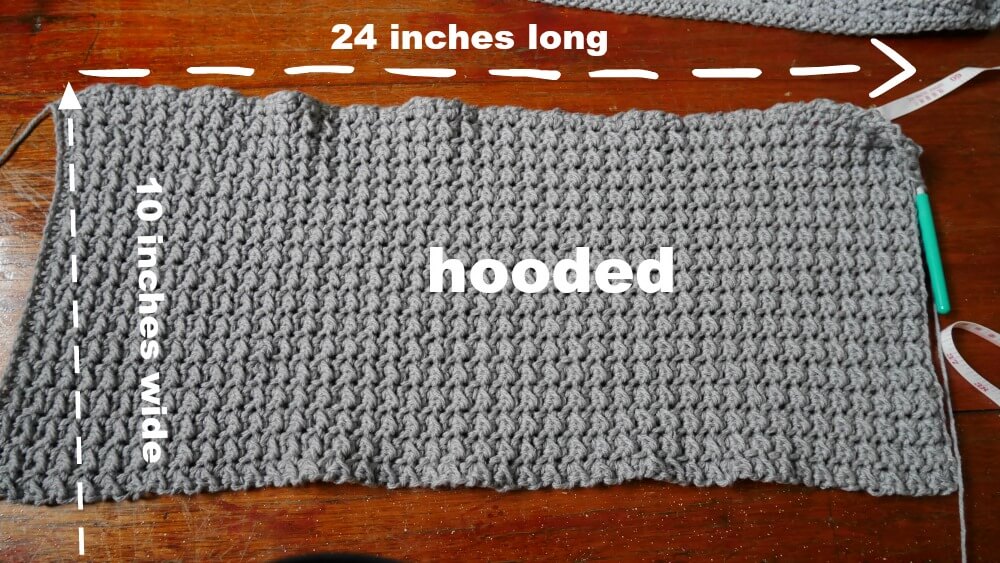
Crocheting the Hooded.
- Measurement of the hooded.
- 10 inches wide
- 24 inches long
For all size, Start off by making a slip knot, Then make 34 chains (foundation chain)
Row1. hdc in the next chain from hook, then hdc in each chain across until the end of the row, ch1 turn.
Row2. *hdc in next st , then sl st in next st* repeat * to * across until the end of the row. Ch1 turn
Row3. Repeat row 2 until the piece measures approximately 24 inches long or desired length. Fasten off.
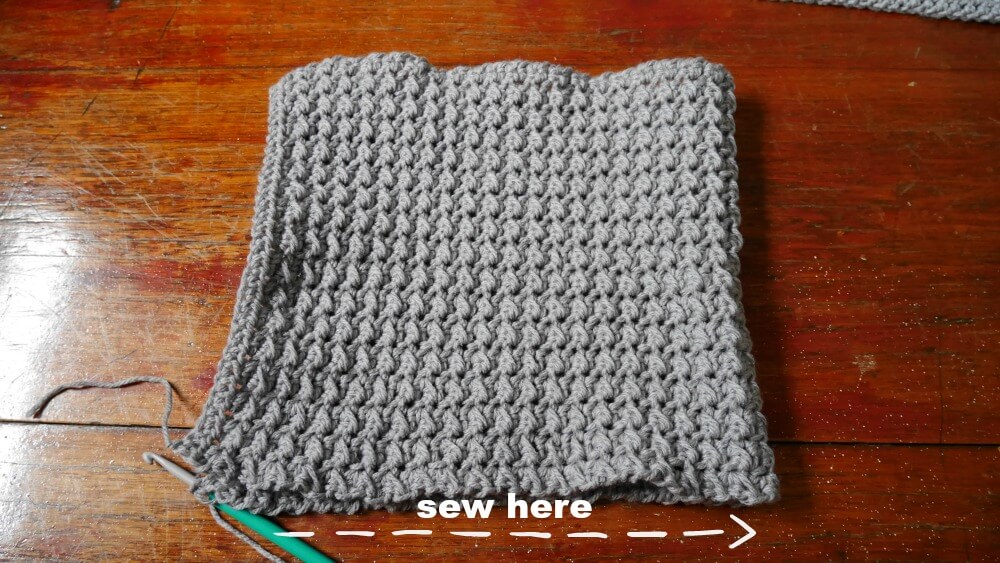
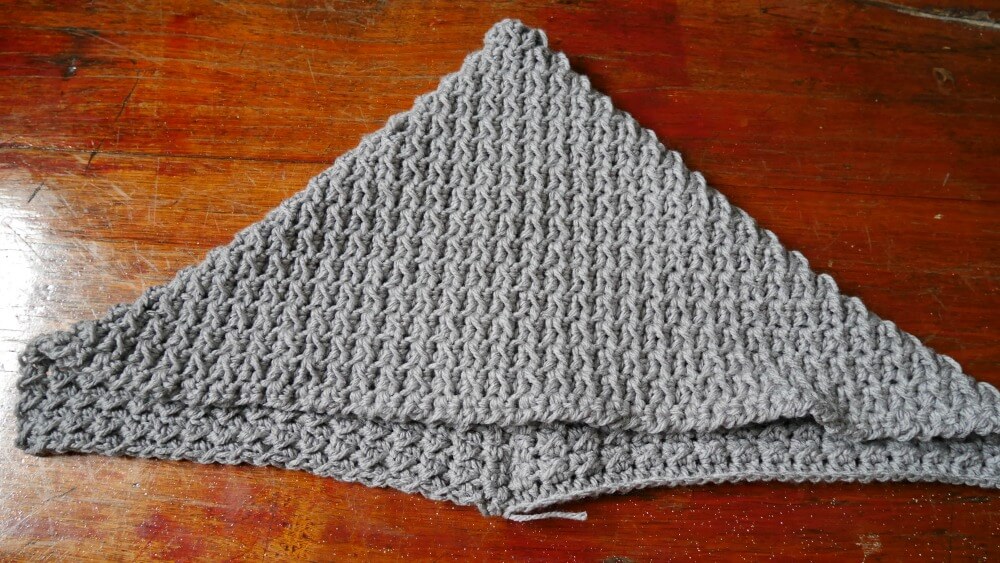
Then fold the rectangle in half and sew on one side to create the hood.
Set aside waiting for assembly.
Time to assemble pocket to the jacket.
We will assemble the front panel first to create the pocket.
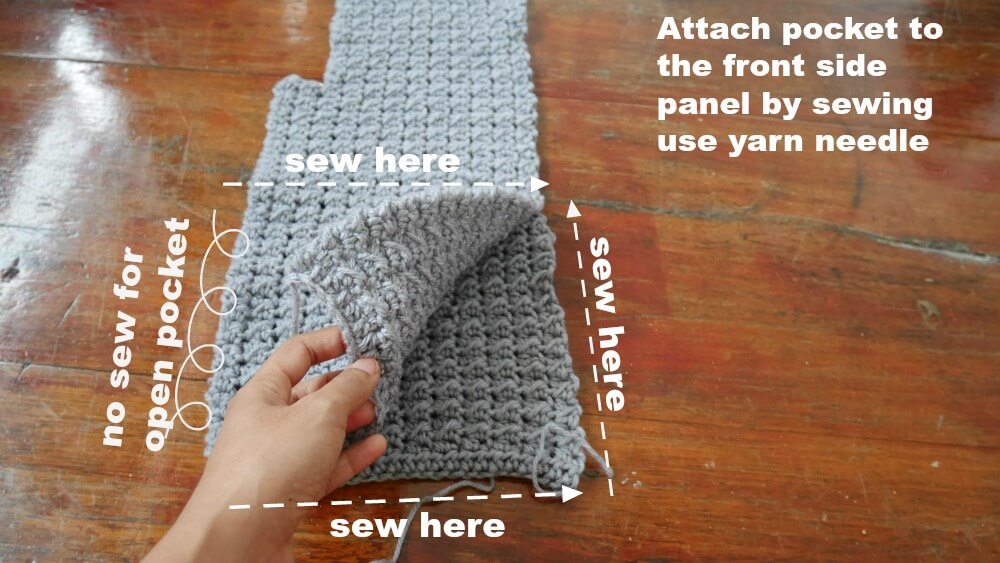
Lay the pocket pieces under the front panel so it does not so confuse the right side or left side ( just my way ), but you guys can do it your way, whatever is easy for you.
Sewing them by using your yarn needle.
Repeat on the other side. After the finish will look like this.

Time to assemble the back panel to the front panel.
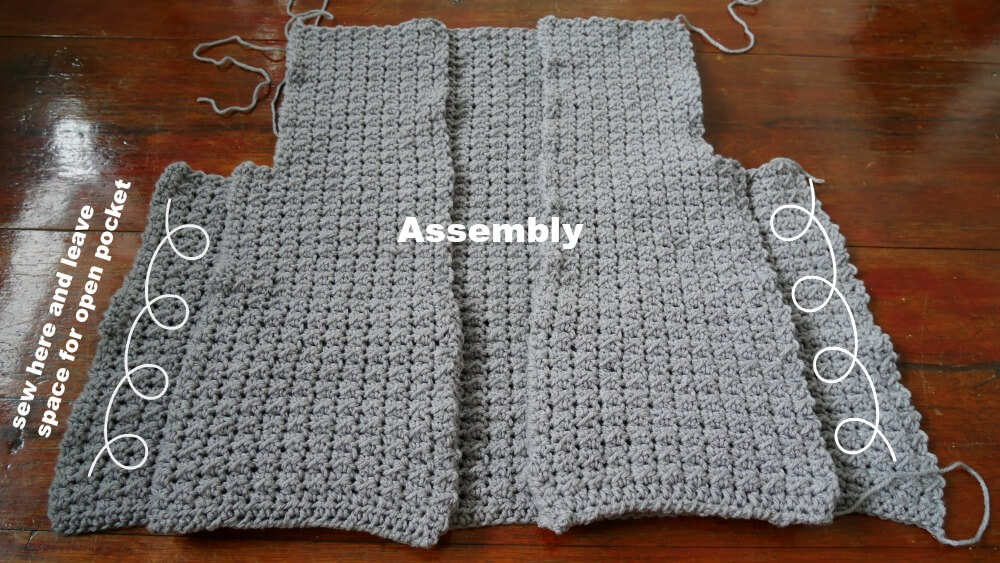
After finished sew of the back panel to the front panel now it time to attach hooded to the vest.
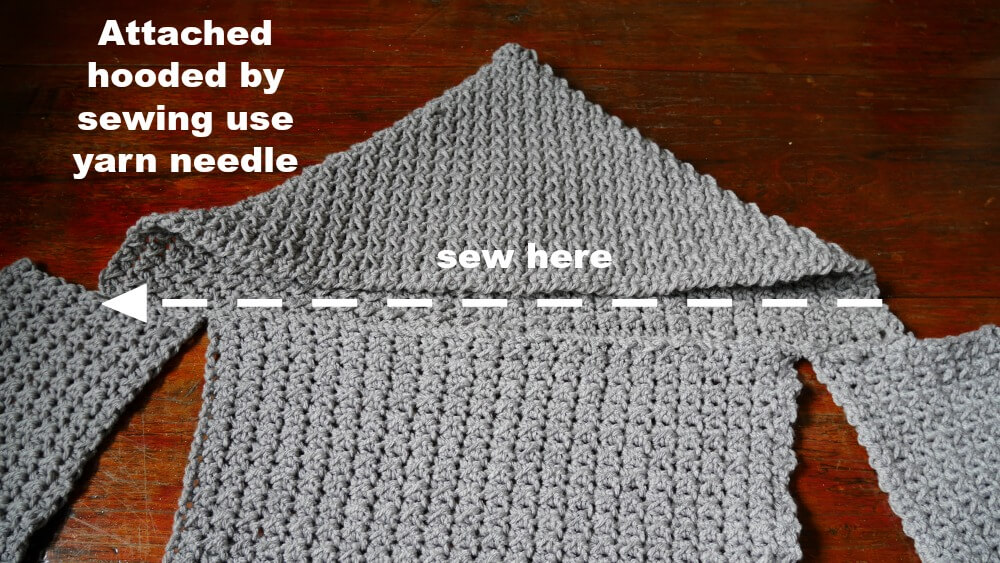
To create the shoulder.
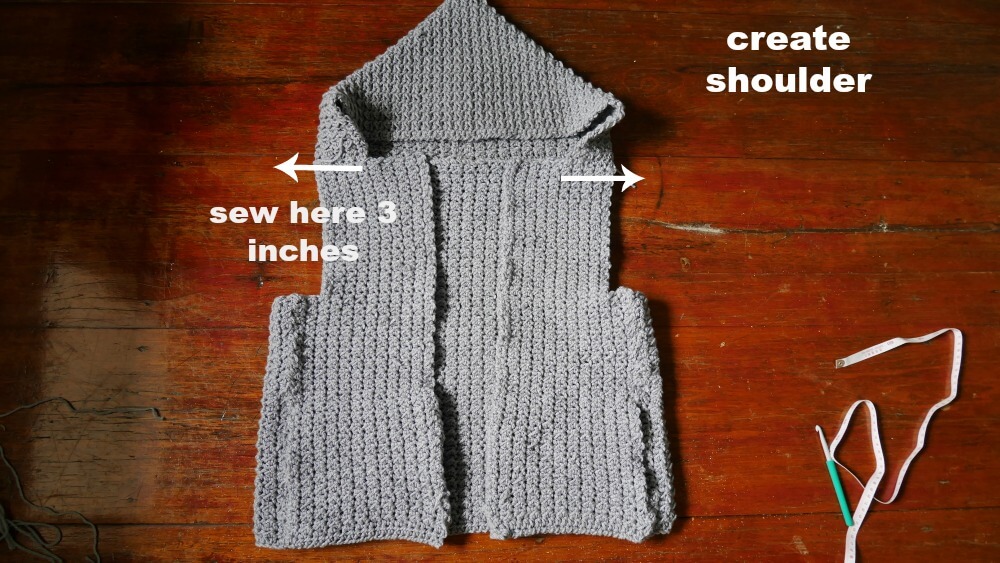
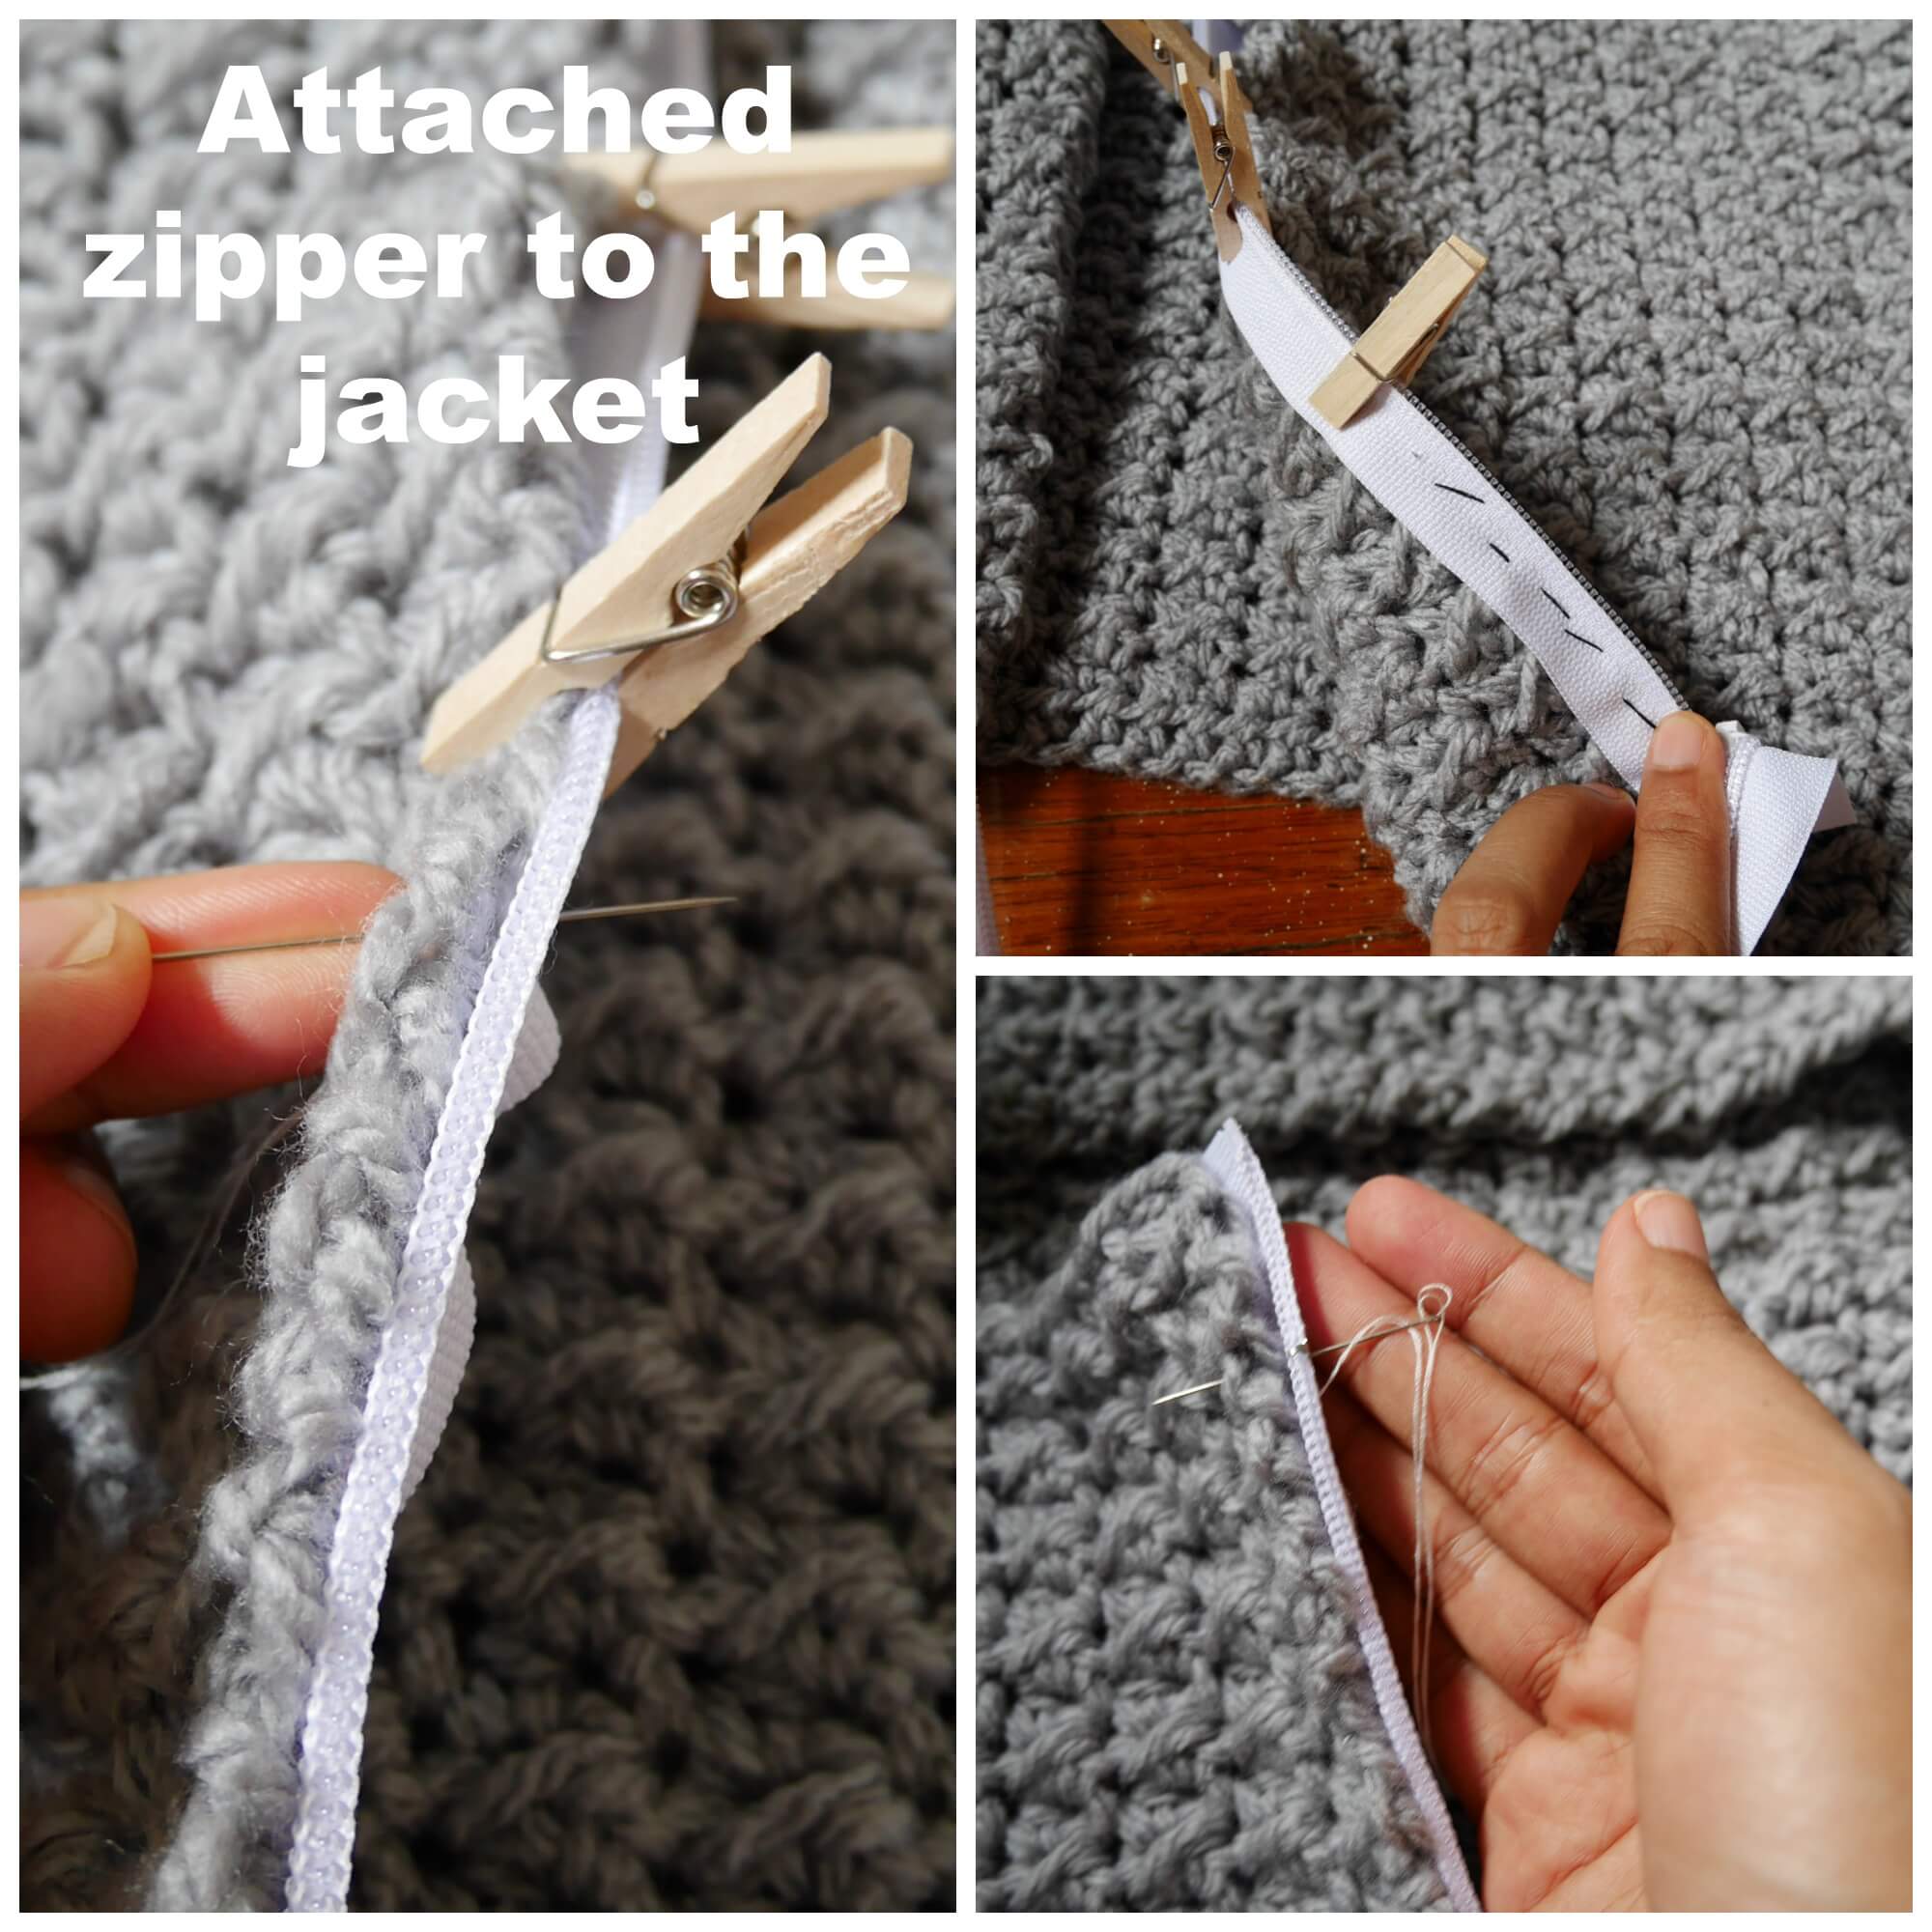
Attach the zipper to the jacket.
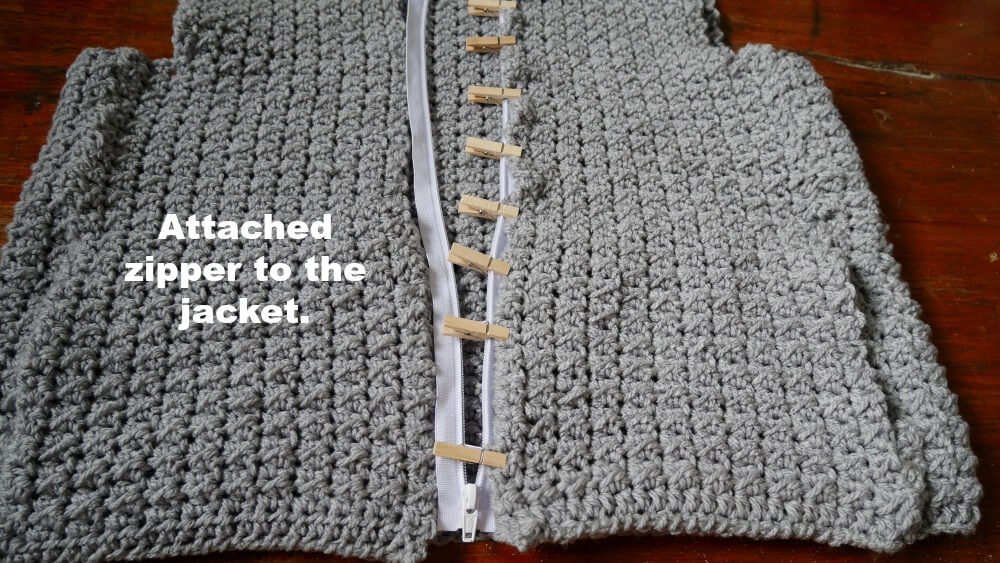
Get the zipper at 20 inches in length for small to medium sizes, then unzip and line them up flatted using a clipper to fix the position when sewing. I am hand sewing.
Bring a threaded needle and the thread color that matches the color of the zipper and begin to sew. See pic below.
Finally, at the armhole, you will join yarn at the armhole and sc around the armhole for 2 or 3 rows; all done!

Hope you guys enjoy making this crochet Hooded jacket.
If you make one I would love to see your creation tag me on Instagram! would love to see your creation.
Happy crocheting.
VANDANA
Friday 16th of August 2019
i want to add sleeves too. can u help me with the pattern
jane
Saturday 17th of August 2019
Hi, For add sleeve first you join new yarn at any point then sc around the edge for 1 round then make double crochet round by round until u get your desired length.
Martha
Tuesday 8th of January 2019
Wonderful pattern, I can't wait to make this! Thank you so much for sharing it!!!!
jane
Friday 11th of January 2019
Thanks you Martha, hope you enjoy it.
Marie Lambaatjeen
Monday 12th of November 2018
Very versatile