

Meet twist me pretty crochet top! This top is adapt from the popular easy cross front summer top from the previous post.

They are beginner friendly, mostly use double crochet stitch. So if you guys can make double crochet stitch so you can made this top as easy as pie.

This twist me pretty top is made from 100% cotton yarn which is great for summer season also very easy to wear can wear in many different style , front twist like a crop top or cross front like a pretty angle lol.

The special cuteness on the sleeve is ruffle that I add is very easy also.

Get the free pattern below or this pattern is also available as an inexpensive, ad-free, PDF printable instant download in my etsy shop. Thank you so much for your love and support. I am really appreciate you.
Let’s get start!
– I used Lion brand 24/7 cotton yarn weight 4 aran. I use around 700-800 yard.
– 4.0 mm crochet hook
– Sewing yarn needle
-stitch marker
-3 wooden buttons about 1 inch big.
Gauge: 3 double crochet stitch x 3 row = 1 inch
Skill and abbreviations
You will need to know how to make (American crochet term)
-dc which mean double crochet
-sc which mean single crochet
-dc increase which mean make 2dc in the same stitch
-ch Chain
-slip knot
Finished Size Approximately: S-3XL easy to adjust
This top is made in size small. the other sizes are easy to adjust by just add more chain to make it wider . see pattern detail below for bigger size. For me the model wearing this piece, I am 4’9 feet tall.
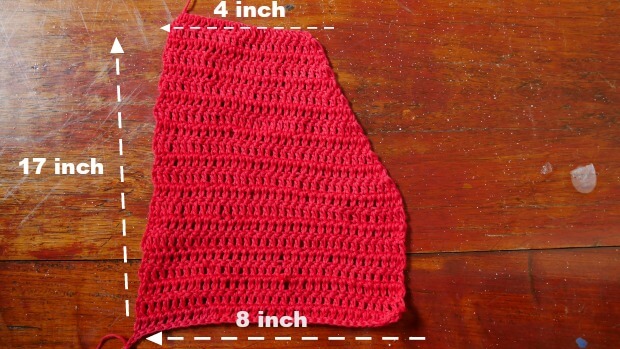
Measurement.
front panel.
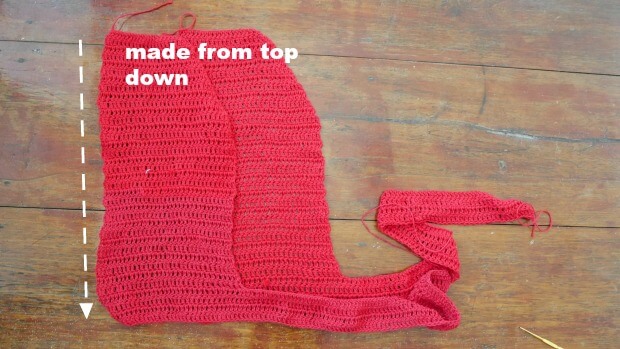
We will make this twist me pretty top from top to bottom.
Start with one shoulder by Pick up crochet hook size 4.0 mm and Start of by making a slip knot Then make 22 chains ( small size ) (foundation chain in even number)
ch26 ( size medium) turn.
ch30 ( size large) turn.
ch34 ( size XL) turn.
ch38 ( size 2XL) turn.
ch44 ( size 3XL) turn.
Row1: make 1dc in the next chain from hook and across until the end of the row, ch2 turn
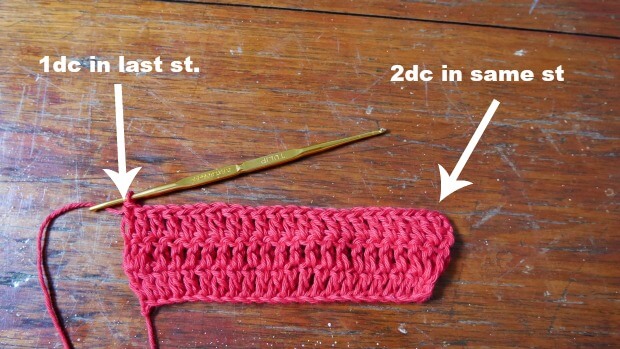
Row2 now you will work 1dc in each stitch across until end of the row in the last st make 2dc . ch2 turn.
Row3. now you will work 2dc in first stitch then 1dc in each stitch across until end of the row. ch2 turn.
Row4. now you will work 1dc in each stitch across until end of the row in the last st make 2dc . ch2 turn.
Row5. now you will work 2dc in first stitch then 1dc in each stitch across until end of the row. ch2 turn.
Row6. now you will work 1dc in each stitch across until end of the row in the last st make 2dc . ch2 turn.
Row7. now you will work 2dc in first stitch then 1dc in each stitch across until end of the row. ch2 turn.
Row8. now you will work 1dc in each stitch across until end of the row in the last st make 2dc . ch2 turn.
Row9. now you will work 2dc in first stitch then 1dc in each stitch across until end of the row. ch2 turn.
Row10. now you will work 1dc in each stitch across until end of the row in the last st make 2dc . ch2 turn.
Row11. now you will work 2dc in first stitch then 1dc in each stitch across until end of the row. ch2 turn.
Row12. now you will work 1dc in each stitch across until end of the row in the last st make 2dc . ch2 turn.
Row13. now you will work 2dc in first stitch then 1dc in each stitch across until end of the row. ch2 turn.

Row14. now you will work 1dc in each stitch across until end of the row . ch2 turn.
Row15. now you will repeat row 14 until you get 17 inch long or your desired length.
After we get 17 inch long for the front panel we will continue to make a bow tie to wrap around your body.

On the last row when we get to 17 inch long , On this row we will start to make the bow tie to wrap around your body by chain 100, then turn.
( the number of chain that you will make it varies depend on how they can wrap around your body)
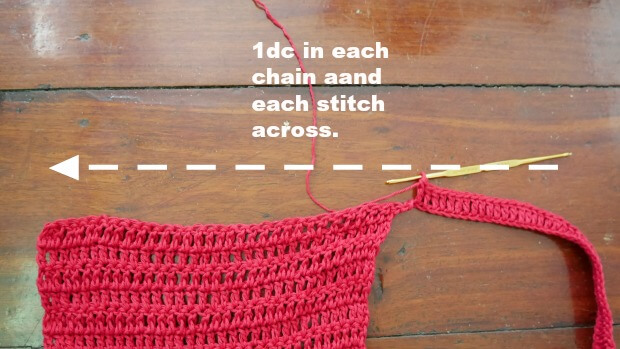
Row1 of bow tie: make 1dc in the next chain from hook and in each st across until the end of the row, ch2 turn.
Row2 of bow tie: make 1dc in the next chain from hook and across until the end of the row, ch2 turn.
Row 3 of bow tie, Repeat row 2 and until you get 1 inch thick of band.
And repeat the same for the second front panel.
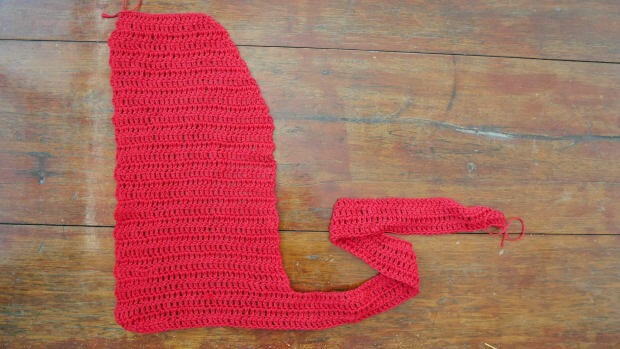
Afer we finished 2piece of front panel.
lay them in flatted.
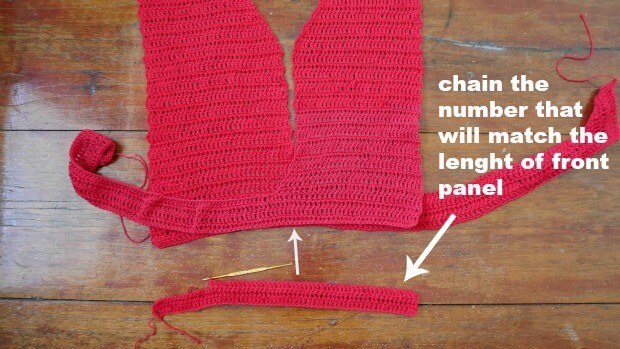
Back panel.
Start by chain the number that match with your front panel.
Row1. dc in each chain across. ch2 turn.
Row2. 1dc in each st across, ch2 turn.
Row 3 and beyond ,….Repeat row 2 until you get 18 inch long. or your desired length.
Assembly.
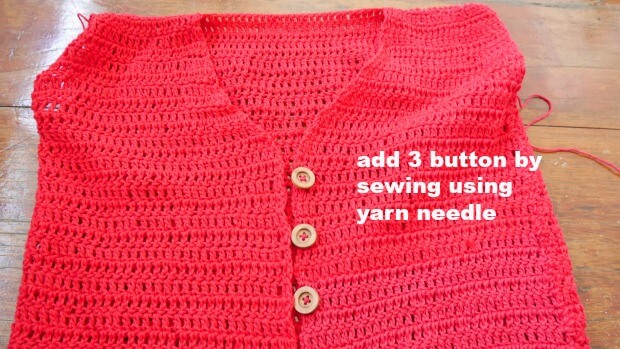
lay front panel on top of back panel. sew each side as the pic above.
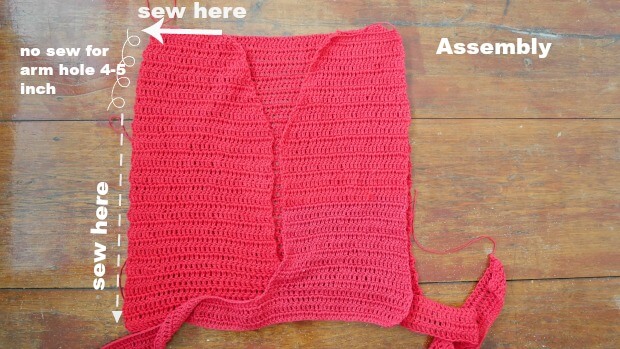
Then add 3 button by sewing using yarn needle.
Make the short sleeve.
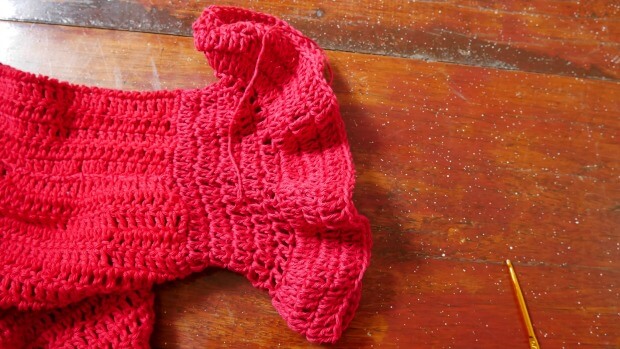
Make sc around the armhole for one round.
Then start to make a sleeve by
We will work in spiral, do no turn and chain.
Row1. dc in each st around.
Row2. 1dc in each st around.
Row 3. 1dc in each st around.
Row4. 1dc in each st around.
Then we will start to making ruffle .
Row1 of ruffle. *2dc in next st , 3dc in next* repeat * to * around.
Row2 of ruffle. *1dc in each st ,* repeat * to * around.
Row3 of ruffle. *1dc in each st ,* repeat * to * around. Fasten off.
All done!

I hope u enjoy it.

Rebecca
Tuesday 28th of January 2020
What weight of yarn to use? Worsted, DK, Fingering?
jane
Thursday 30th of January 2020
Hi Rebecca, it's worsted weight.
Lynn
Saturday 5th of October 2019
How many skeins would be needed fo each size? I would like to have the same dye lot on my yarn.This would be perfect for my nieces, cant wait to make.
jane
Thursday 26th of December 2019
Sorry , I donot know how many skein for each size I just estimate the yard for the size that I wear.
Kleidung
Wednesday 2nd of October 2019
Toller Artikel. Vielen Dank.
IARA NUNES DE ALENCAR
Sunday 18th of August 2019
Adorei nao falo ingles, mas eu entendi pelas imagens. thank you
Cathrin
Saturday 29th of June 2019
Can this be made with acrylic?
jane
Thursday 4th of July 2019
HI Cathrin, yes you can make them with acrylic yarn.