
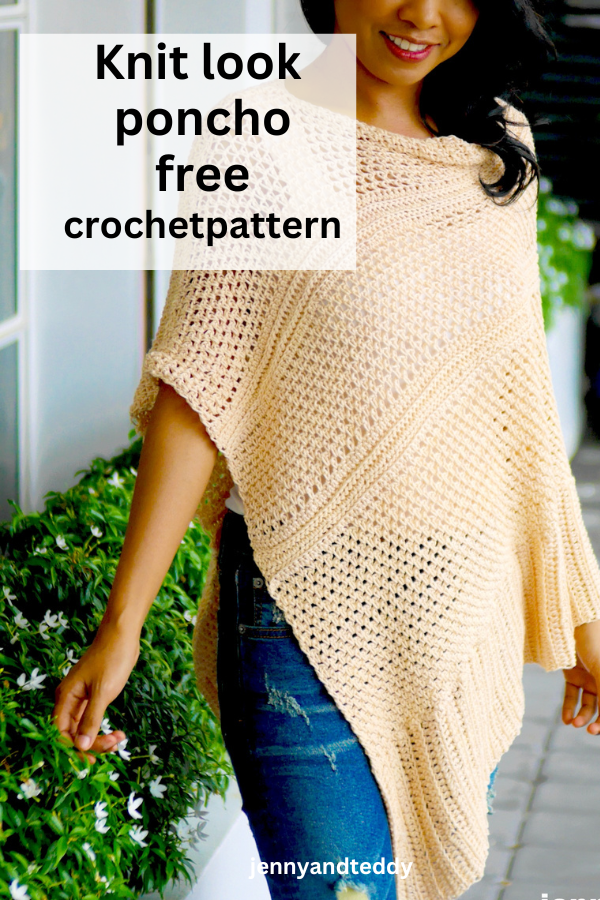

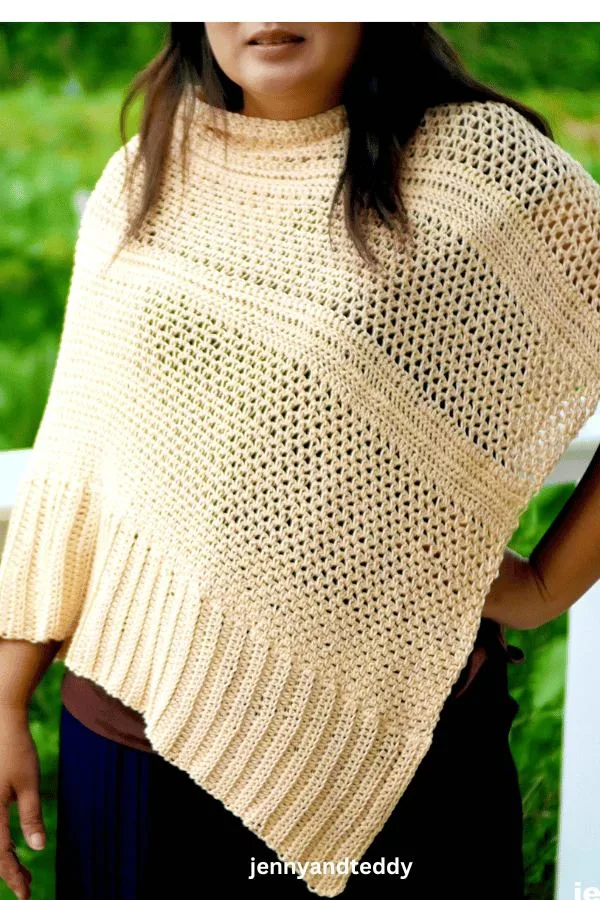
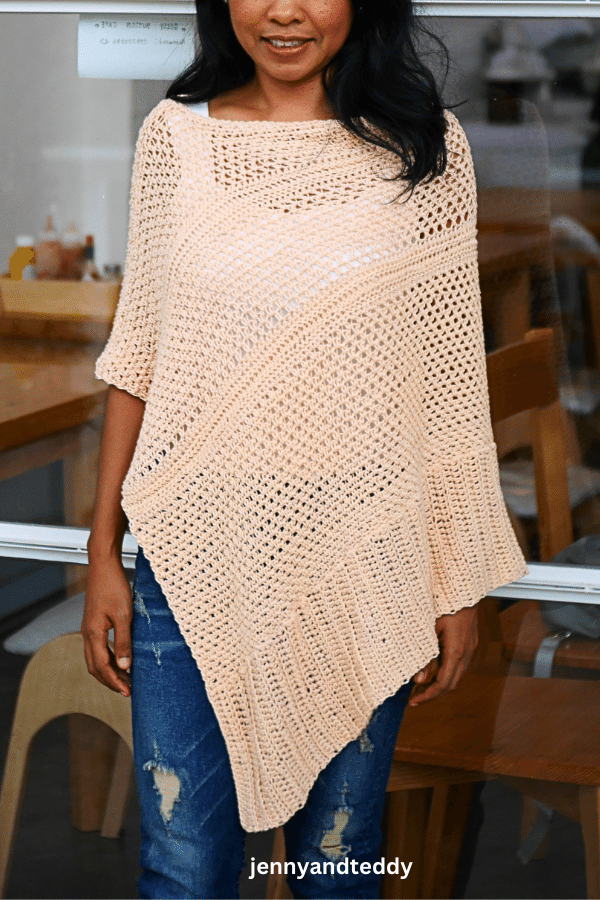
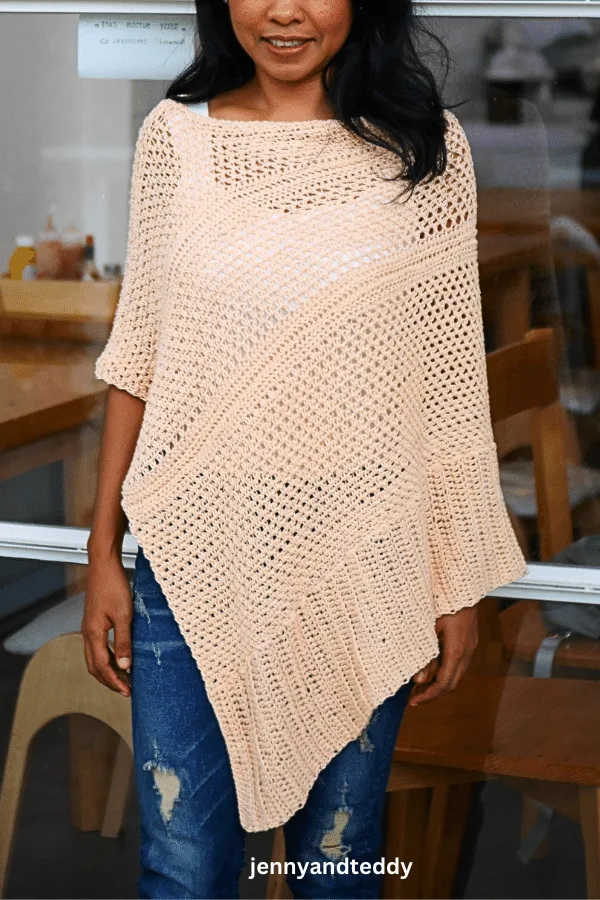
This elegant knit look poncho crochet pattern is forever my favorite garment to wear this springtime when I need a layering piece to go on top of my singlet.
Recently, I have been obsessed with crochet knit stitches. They look basic yet but chic to me.
Moreover, these crochet stitches that look knit when we incorporate them into the crochet garment.
It makes the whole crochet project look classy without trying too much ( by that, I mean without trying to add difficult fancy-looking crochet stitches).
Sophisticated & easy knit look poncho crochet pattern.
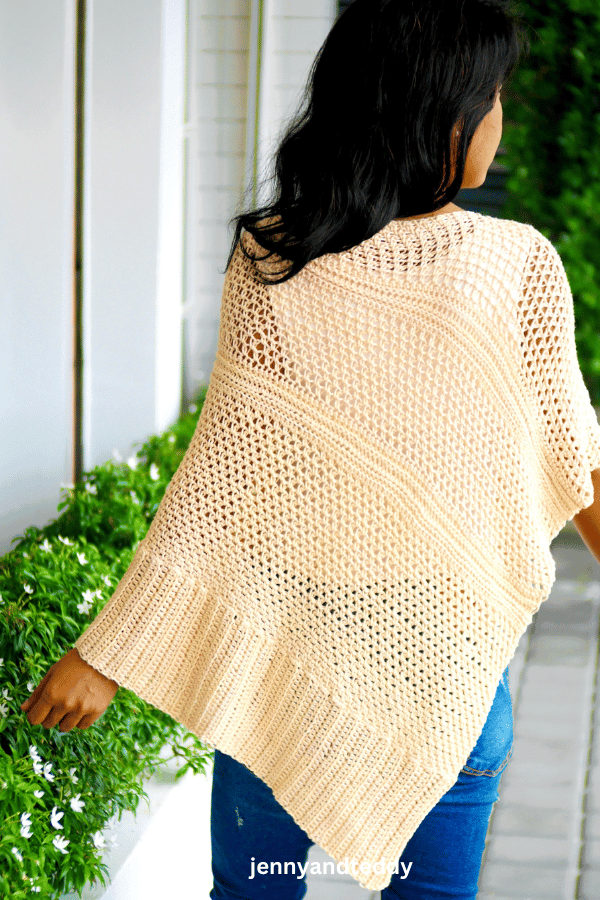
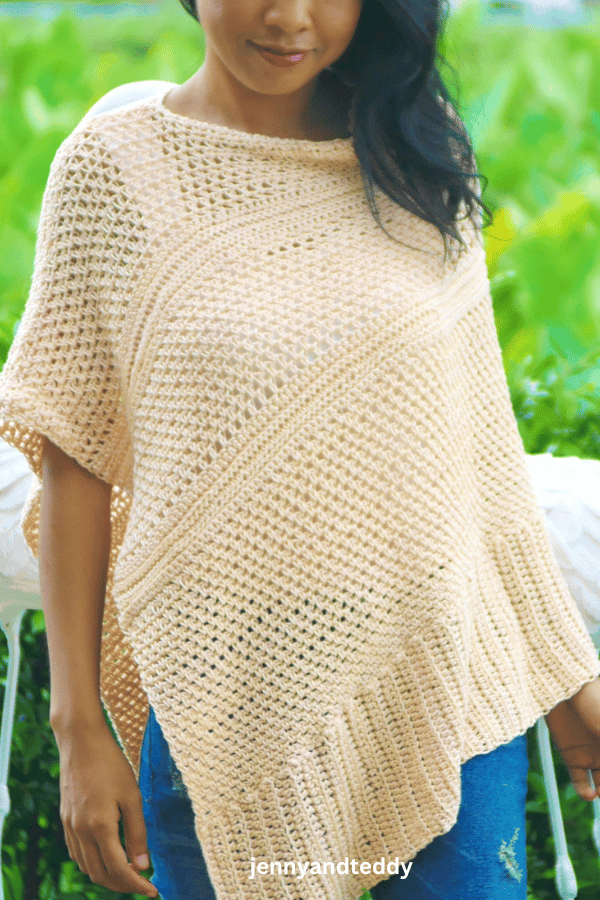
The love you to the moon poncho features a beautiful ribbed edge at the bottom part that will add a classy And modern look when you put them on.
The name of this easy poncho free pattern called ” Love You To The Moon” reminds me of my forever love for my mom; She always is the number one in my heart.
My mom she so kind, gentle, fun, and loveable. She also likes to dress up as I do makes us both happy.

How to crochet a knit-like poncho?
This crochet one-rectangle poncho or you called it a wrapcho lol.. is made from just one long rectangle.
Fold them up in half and sew the side to create a shoulder, and that’s it; you’re done.
Now let me break it down into 3 easy steps for you.
- Step 1: make the band; we will crochet a ribbed band as long as you like but remember this band will fold in half, so the longer you make the band will dive by 2. So just make it wrap your shoulder and give more length for loose fitting.
- Step 2: make the body part; after we get your desired length of the ribbed band now, we are going to crochet the body part of the poncho by crocheting the knit stitch on top of the ribbed band. And be creative; you can pick any of your favorite crochet stitches to add to it doesn’t need to be exactly like the pattern.
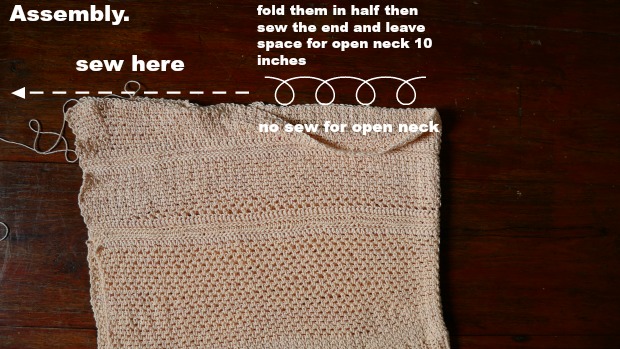
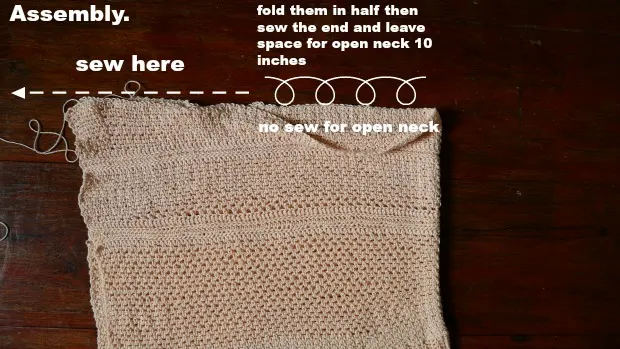
- Step 3: assemble; when we got the body part of the poncho, now time to seam the poncho; fold them in half, then sew on the top to create the shoulder; that’s all we did!

Stitch used in this knit look poncho crochet pattern.
Crocheted a poncho in this pattern needs some basic stitches, which is beginner friendly for less experienced crocheters.
- Half double crochet in the back loop: is used for creating the ribbed band for the bottom part of the poncho.
- Crochet linen/moss stitch: which definitely gives the poncho kind of look like a knit project.
- Single crochet in the back loop: This is used to create the strip line between the body part of the poncho.
Yarn for this poncho pattern.
Cotton yarn: Love you to the moon poncho pattern I use cotton dk weight yarn/3 light. I always love to work with cotton yarn because they have a beautiful drape and great weight that give to the whole crochet garment.
Acrylic yarn and Wool yarn: also work great for this free crochet poncho pattern. They are more stretchy and lightweight than cotton yarn, and a plus is they keep you warm in the winter months.
Can’t get enough easy poncho patterns to crochet?
Supplies & material.
- I used Cotton DK-weight yarn. I am using about 1200-1500 yard fit sizes, small to Large. ( easy to adjust the size. See pattern instruction below) yarn weight 3.
- DK yarn 3 weight, Lion brand coboo, viscose & cotton baby yarn from darn good yarn. Or any cotton blend yarn with DK weight.
- 4.0 mm and 5.0 mm crochet hook.
- Sewing yarn needle
Gauge: 4 half double crochet stitches = 1 inch
Note:
we are crocheting this poncho wrap not too tight. and they work from bottom to top.
Skill and abbreviations.
- (American crochet terms)
- You will need to know how to make
- St, which means stitch
- Sl st, which means slip stitch
- sc which means single crochet
- hdc, which means half double crochet
- Blo, which means crochet in the back loop only
- ch, Chain
- slip knot
- linen/moss stitch
Finished Size Approximately:
Small to Large ( Easy to adjust by adding more ribbed band for bigger size)
Me and my friend she the model are wearing the same example piece; I am 4’9 feet tall, size small, and my friend she size large.
How to crochet knit stitch poncho video tutorial.


Kint look poncho crochet free pattern instruction.
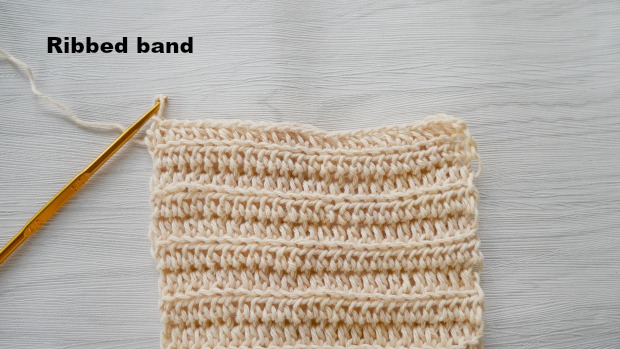

First, we started to create the ribbed band.
Pick up your 4.0 mm. crochet hook, then Start with a slip knot, then crochet 26 chains= about 6.5 inches thick.
Row1. crochet 1hdc in each of the next 25 chains from hook, ch1 turn
Row2. crochet 1 hdc in each of the next 25 stitches from hook ( blo only), ch1 turn
Repeat row 2 until the rectangular piece gets around 40 inches long.

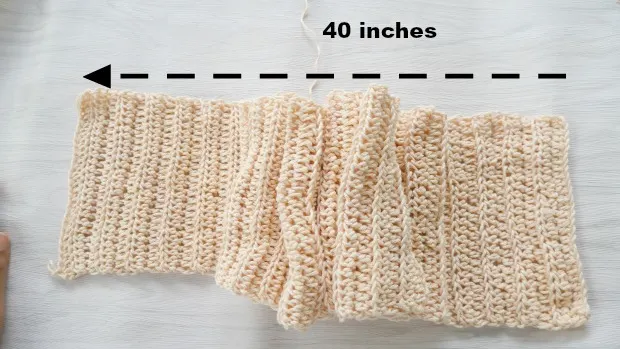
- Size small to Large the ribbed band is 40 inches long
- Size XL to 2XL, the ribbed band is 46 inches long
- Size 3XL to 4XL, the ribbed band is 52 inches long
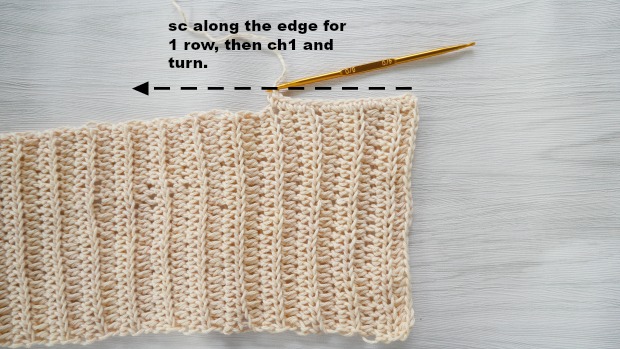
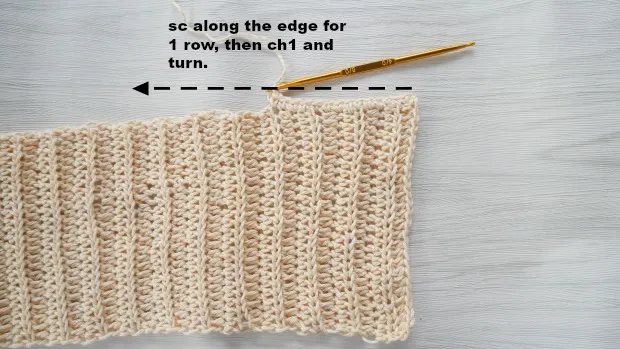
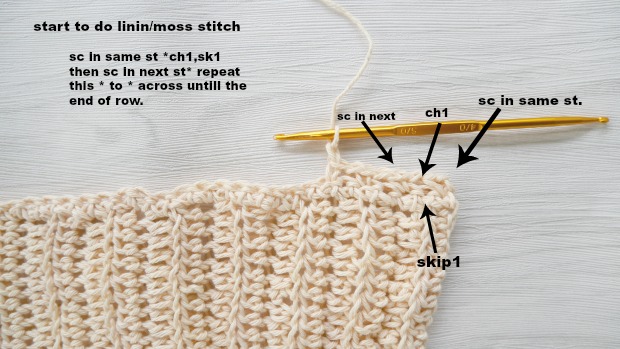

Start the first body part of the poncho using the linen/moss stitch.
Row1. (with4.0 mm hook) After we get the length of your size now, we are going to make sc at each stitch or space along the edge of the ribbed band for 1 row to start the base body for the poncho. At the end of the row, ch1 and turn.
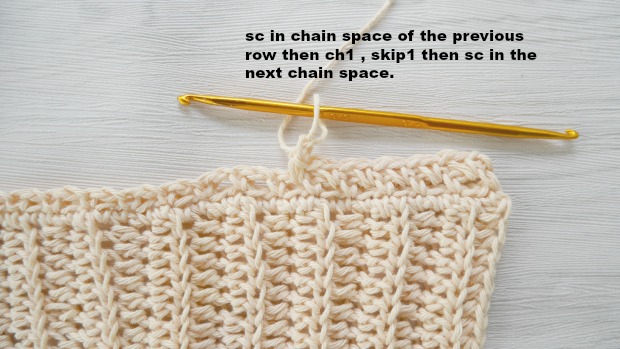
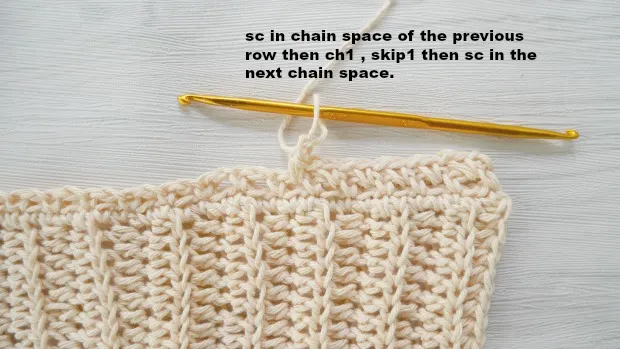
Row2. (with5.0 mm hook) sc in the next stitch from hook * ch1, skip 1 st, sc in next st * repeat * to * across until the end of the row. Ch1 turn
Row3. (with5.0 mm hook) sc in the first ch space * ch1, skip 1 st, sc in the next ch space * repeat * to * across until the end of the row and make sc on the turning ch. Ch1 turn
Repeat row 3 until (with a 5.0 mm hook) your piece measures approximately 7-8 inches deep.


After we get your 7-8 inches deep of linen/moss stitch, then we are going to start to make a first strip line by,
Make a strip line (with a 5.0 mm hook).
Row1. *1sc in each stitch and chain space* repeat * to * across until the end of the row. Ch1 turn
Row2. crochet in the Back loop only; make sl st in each stitch across until the end of the row. Ch1 turn
Row3. crochet in the Back loop only; make sl st in each stitch across until the end of the row. Ch1 turn
Row4. crochet in the back loop only, sc in each stitch across until the end of the row. Ch1 turn
Row5. crochet in the Back loop only; make sl st in each stitch across until the end of the row. Ch1 turn
Row6. crochet in the Back loop only; make sl st in each stitch across until the end of the row. Ch1 turn
Row7. crochet in the back loop only, sc in each stitch across until the end of the row. Ch1 turn
After we make our first strip line, then we are going to make a second linin/moss stitch again for 4 inches deep.
Start for the second part, linen/moss stitch.
(with 5.0 mm hook).
Row1. sc in the second chain from the hook and each chain across, ch1 turn
Row2. sc in the next stitch from hook * ch1, skip 1 st, sc in next st * repeat * to * across until the end of the row. Ch1 turn
Row3. sc in the first ch space * ch1, skip 1 st, sc in the next ch space * repeat * to * across until the end of the row and make sc on the turning ch. Ch1 turn
Repeat row 3 until your piece measures approximately 4 inches deep.
After we get your 4 inches deep of linen/moss stitch then, we are going to start to make a second strip line (with5.0 mm hook).
Row1. *1sc in each stitch and chain space* repeat * to * across until the end of the row. Ch1 turn
Row2. crochet in the Back loop only; make sl st in each stitch across until the end of the row. Ch1 turn
Row3. crochet in the Back loop only; make sl st in each stitch across until the end of the row. Ch1 turn
Row4. crochet in the back loop only, sc in each stitch across until the end of the row. Ch1 turn
Row5. crochet in the Back loop only; make sl st in each stitch across until the end of the row. Ch1 turn
Row6. crochet in the Back loop only; make sl st in each stitch across until the end of the row. Ch1 turn
Row7. crochet in the back loop only, sc in each stitch across until the end of the row. Ch1 turn
After we make our second strip line, then we are going to make a linin/moss stitch again for 3 inches deep.
Start a third for linin/moss stitch.
(with 5.0 mm hook).
Row1. sc in the second chain from the hook and each chain across, ch1 turn
Row2. sc in the next stitch from hook * ch1, skip 1 st, sc in next st * repeat * to * across until the end of the row. Ch1 turn
Row3. sc in the first ch space * ch1, skip 1 st, sc in the next ch space * repeat * to * across until the end of the row and make sc on the turning ch. Ch1 turn
Repeat row 3 until your piece measures approximately 3 inches deep.
Then fasten off and leave the long tail for sewing.
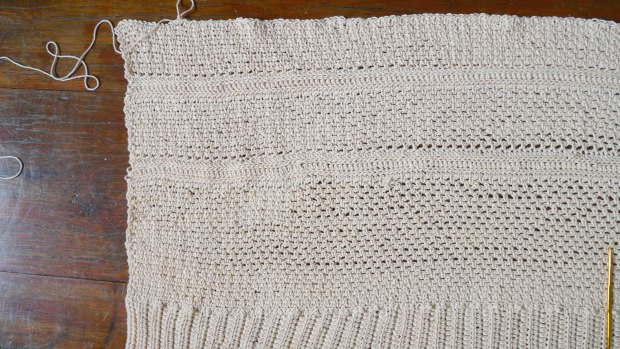
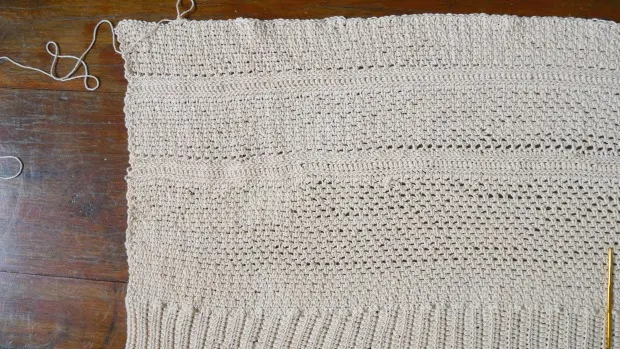
Assembly poncho.
After we all finished with the long rectangle piece, now time for assembly.
Lay a piece of a big rectangle in flatted and then fold them in half and sew along to create the shoulder. See pic below.
All done!
Happy crocheting!
If you make one, I would love to see your creation. Tag me on Instagram!
Judith Harrington
Tuesday 10th of September 2019
The finished neck is not shown in this pattern photo. I am almost finished with my poncho and there is quite a gap of crochet flapping around the neck. I am disappointed with the neck. Is there some idea to help with this?
jane
Wednesday 11th of September 2019
HI Judith, For the neck, after finished the long piece of rectangle then we fold them up in half and sew the end and leave the open neck for around 8-10 inches That all There will be a flapping around the neck also. Sorry about that.