

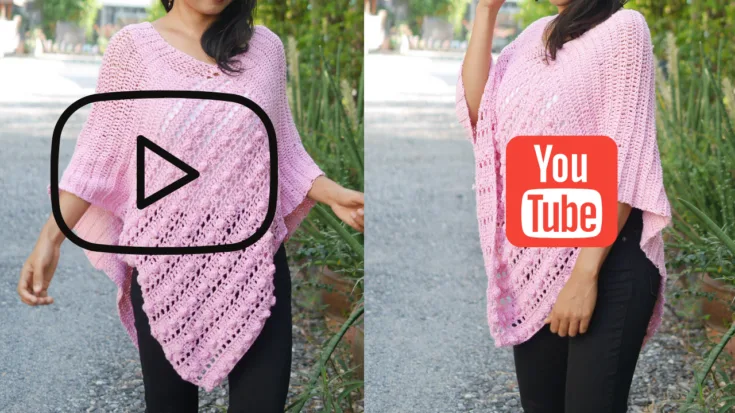
This crochet bobble stitch poncho pattern is my third attempt After I experiment with making a couple of easy ones.
And I had just Learned how to crochet bobble stitch. Well, I think I will put this beautiful texture stitch in use for my new poncho-free pattern. Let’s Meet the Bubble gum cute and easy crochet poncho pattern!

Easy crochet Bobble stitch poncho pattern.
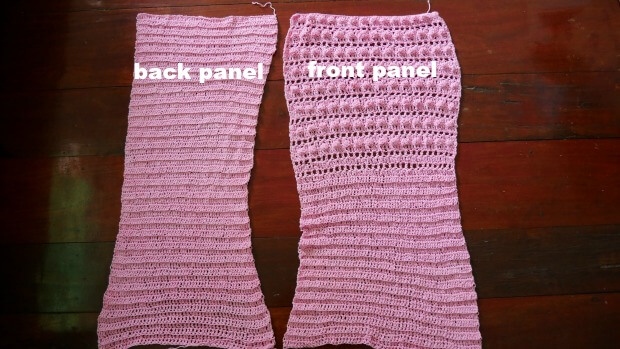
This crochet texture poncho is made from just 2 rectangles I pick out a beautiful and sophisticated pink pastel color that will make you feel like you are a princessssss…. when you put them on wowww can you imagine that? Yep I do!
This bubble gum poncho features a beautiful V-neckline that is easy to create.
The front panel of this poncho is made by crocheting a bobble stitch and then continuing to the back panel with basic crochet stitch use.

Best yarn to use for this bobble stitch crochet poncho tutorial?
- Cotton yarn: Well, I made this Bubble gun poncho with 100% cotton yarn DK weight that will give you a breezy look and is lightweight and perfect to wear for the fall season. Moreover, you will feel comfy on your skin.
- Wool yarn: if you guys want them to be a bit warmer and great for winter, just swish up with 100 % wool yarn or wool blend yarn in DK weight that will keep you toasty warm for freezing cold days.
- Acrylic yarn: polyester fiber yarn is budget-friendly yarn That I love to use in many of my crochet projects. They give more flexibility and stretchiness to the garment and keep the heat in your body so you won’t get cold easily in the winter.

How to do a bobble crochet stitch?
To crochet a Bobble stitch: yarn over insert your hook into the stitch that you want to make bobble, then pull up a loop and yarn over, pull through 2 loops.
Then, insert your hook into the same stitch, and repeat that 4 times until having 6 loops on your hook; then yarn over, pull through all 6 loops and make a single in the next st. Bobble complete!
I have made Bobble stitch video tutorial for those who are visual learners.
Need more easy ponchos crochet patterns to make for this fall season?

Supplies & material.
- I used cotton DK-weight yarn. I am using about 6-7skein around 1,200-yard fit size small to Large.
- ( easy to adjust the size. See pattern instruction below)
- Color is pink
- 4.0 mm crochet hook
- Sewing yarn needle
- Gauge: 3 double crochet stitches = 1 inch
Note: we are crocheting this poncho loosely, not too tight.

Get the free pattern below or this pattern is also available as an inexpensive, ad-free, PDF printable instant download in my etsy shop. Thank you so much for your love and support. I am really appreciate you.
Skill and abbreviations
- (American crochet terms)
- You will need to know how to make
- St, which means stitch
- sc which means single crochet
- dc, which means double crochet
- Blo, which means crochet in the back loop only
- ch, Chain
- slip knot

Bobble stitch: yarn over, insert your hook into the stitch that you want to make a bobble, then pull up a loop and yarn over, pull through 2 loops.
Then insert your hook into the same stitch and repeat that 4 times until having 6 loops on your hook then yarn over, pull through all 6 loops, and make a single in the next st; Bobble complete!
How to crochet a bobble stitch poncho video tutorial.

Finished Size Approximately:
Small to Large (another size to make it bigger by adding more chain to the foundation chain, detail in the pattern)
For me the model wearing this piece, I am 4’9 feet tall.
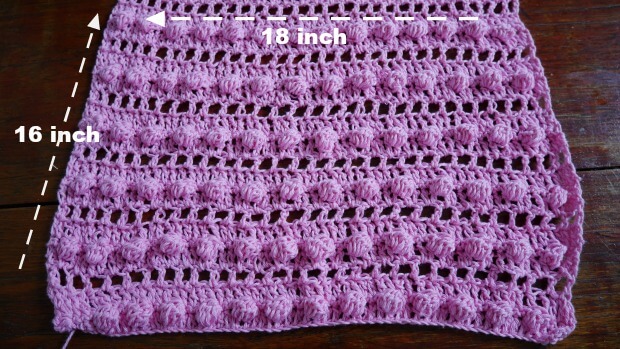
Measurement of the bobble part. ( size small to large)
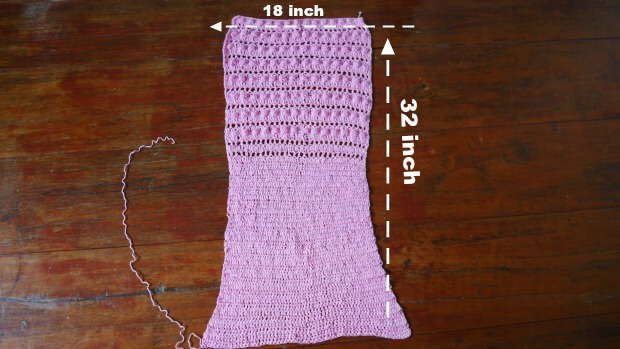
- one rectangle of the front part of the bobble stitch. 18×16 inch.
- one rectangle of the front part 18×32 inches.
Bubble gum texture stitch crochet poncho free pattern instruction.
Front panel.
Pick up a crochet hook size 4.0 mm and Start off by making a slip knot. Then make 60 chains for small to Large.
Foundation chain multiple of 4
size xl and 2xl 72 chains
Row 1: make dc into the next chain from the hook and in each chain across until the end of the row.
Row 2: ch 1 turn, sc into first 2 sts. *Bobble stitch into next stitch, sc into next 3 sts*. Repeat between * and * until you have 3 or 4 sts left, then make sc in each of the last 3 or 4 sts.
Row 3: ch 1 turn, dc in each stitch until the end of the row.
Row 4: ch1, turn, *dc in next st, ch1,skip1 st then dc in next st* repeat this * to * until the end of the row.
Row 5: ch 1 turn, *1dc in each stitch and 1dc in chain space* repeat * to * until the end of the row.
Note…update.
If you see the photo in the front panel of the bobble stitch, if you end with row 5, there will be no space, but I ended it with space with row 4 by accident.
And I went with it. I am lazy to ribbed it off, so you guys can either do both 2 options end with row 5 as the pattern or end with row 4 like in the photo it will all come out beautiful.
Row 6: and beyond, Keep Repeating rows 2-5 until you get 16 inches long.
After we get 16 inches long of the bobble stitch front panel, we will continue to make them longer for the non-bobble part by using another crochet stitch.
Row 1. ch2, then make* 1dc in chain space of the previous row and 1dc on each st* repeat this * to * across until the end of the row.
Row 2. ch2, then 1dc in each stitch across until the end of the row. ( back loop only)
Row 3 and beyond. repeat row 2 until we get 32 inches long. and fasten off.
After we finish the front panel, set aside and wait for assembly.
Back panel.
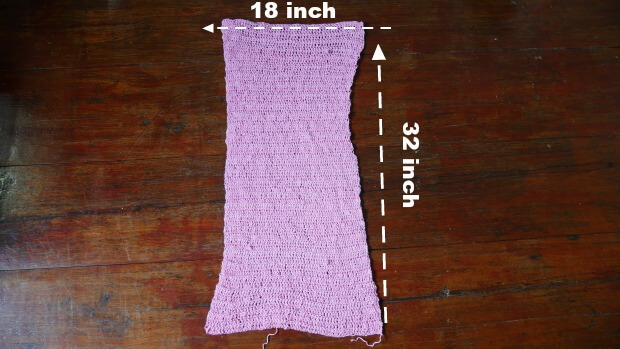
Pick up a crochet hook size 4.0 mm and Start off by making a slip knot. Then make 60 chains ( size small to large)
(foundation chain multiple of 2 )
( size xl and 2xl 72 chains)
( size 3xl and 4xl 84 chains).
Row 1. ch2, then make 1dc in each chain across until the end of the row.
Row 2. ch2, then 1dc in each stitch across until the end of the row. ( back loop only)
Row 3 and beyond. repeat row 2 until we get 32 inches long. and fasten off.
After we finish the back panel, set it aside and wait for assembly.
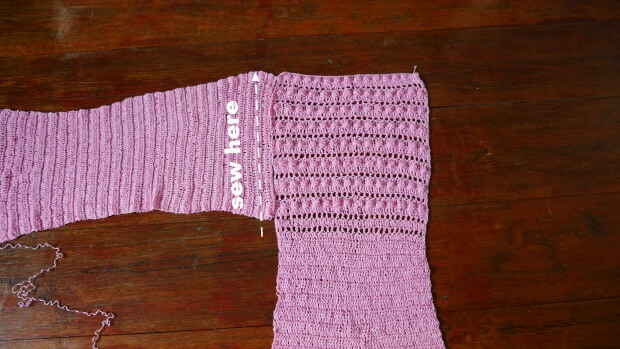
Assembly the poncho.
Lay 2 pieces in flatted in L shape, then use one end of the back panel to attach to the front end of the front panel by sewing with your favorite method.
Pic below.
After attaching the front of the poncho already, we are now going to fold each end to create the back of the poncho and attach them by sewing. see pic below.
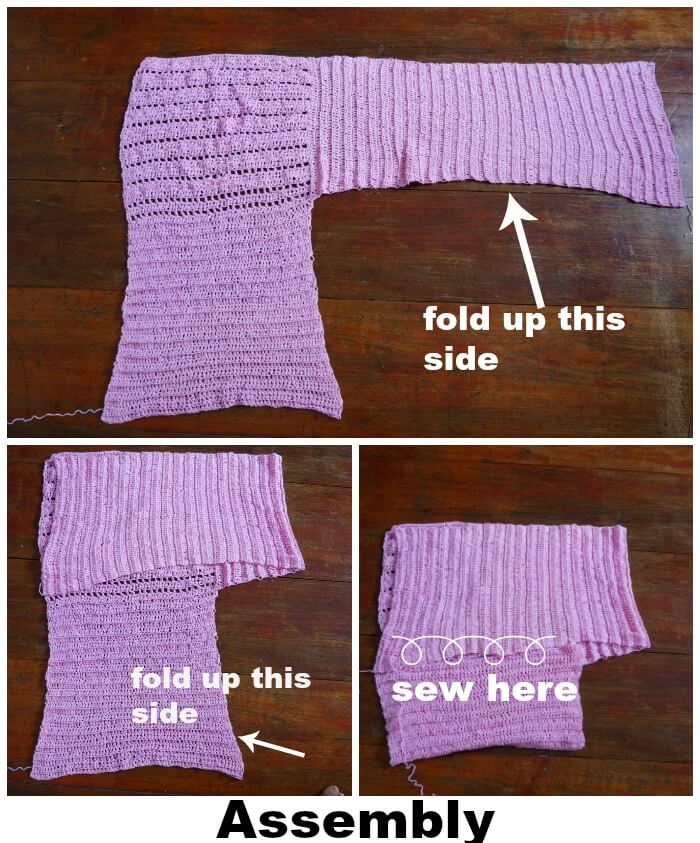
Now when you try it on, and it slips off your shoulder if the open neck is too wide for you, this problem has happened to me.
If the poncho does not slip off your shoulder when you guys try it on, then you do not need to do it.
we will sew a bit further up, about 3-4 inches up from the back panel. see pic below.

Now enjoy your new poncho.
Happy crocheting.
If you make one, I would love to see your creation; tag me on Instagram!
Holly
Friday 16th of December 2022
I love that stitch! And the color is perfect!
Ariel
Friday 2nd of September 2022
The pattern does not down load. Is there a way to get a copy of it now?
jane
Thursday 15th of September 2022
The pdf is in my etsy shop thank u.
Gwen
Monday 26th of April 2021
Thank you. So either way works😊
Gwen
Monday 26th of April 2021
Hi. I’m crocheting this. And I noticed the same as another lady. That if we are ending with row 5. There are no spaces. Are we not supposed to be ending on Row 5 for the bubble gum panel?
jane
Monday 26th of April 2021
HI Gwen, yes in the bobble front panel, I was ending row 5 and 4 by accident so it have space and it come out ok, and i am so lazy to go to ribbed it off and i went as it is.
Yes you could end with row 5 with no spaces it would be more beautiful, but if u like like it look in the photo end it with row4.
Leah
Monday 1st of March 2021
Your instructions need translated. At times just don't make sense
jane
Tuesday 2nd of March 2021
Thank you for suggestion Leah.